|
To watch the youtube video where I go through all the steps with you and explain how the code works, click here. (Recommended.)
APIs - Introduction
So we want to make an API. If you've seen the previous articles (in a series on APIs I've been doing), then you know what an API is, and you've planned out what our API should do, and were even very specific by making a Swagger document.
Now we're going to make an actual API using NodeJS, and we'll eventually host it on Heroku. Installing NodeJS
First, make sure that you have NodeJS installed. As usual, the commands shown will be used in a terminal on Ubuntu 16.04. They may work on other versions of linux, but if not, just find out how to use it on your preferred OS.
sudo apt-get install nodejs-legacy
sudo apt-get install npm
sudo npm install -g n
sudo n stable
We'll need to install some packages using npm, but we'll do that later.
Start With a Node Project
We're going to start by creating a boilerplate node project. In the command line in your project folder:
npm init
For the name, enter "srcmakeapi", for the version enter "1.0.0", for the description you can enter "srcmake api tutorial", and for the entry point enter "index.js". For everything else just press enter.
The previous command has generated a package.json file in our project folder. The package.json file will hold the descriptive information for our project, as well as the node libraries that we're using.
Let's actually install the libraries that we need. The following commands will install the libraries, and include them in our package.json file. npm install --save express npm install --save body-parser sudo npm install -g nodemon
Express is a framework for handing the routing of our server, and body-parser will help get content out of the requests made to our server. Nodemon will allow us to make changes to our code, without having to restart the server every time.
Setting Up The Server
The first thing we need to do is make our project act like a web server, meaning it needs to accept requests from URLs.
We defined our entry point to the application to be index.js, so create a filed named "index.js" and add the following code to it:
The first line defines our app by requiring something from a file named "server". The rest of the code tells the server to listen on port 3000.
Let's create this server functionality by creating a file named "server.js". Add the following code to it:
Here, we declare variables for express, body-parser, and our project directory. We then use express to create our server by invoking it into a variable named app. We let our app use some stuff, for ease of parsing.
Next, we declare a variable named 'routes' that stores what's exported from a file named v1_routes (which we haven't created yet). Our app is then told to pass all requests that begin with /v1 to the routes variable (which is our v1_routes file). Our final line exports this app as a module (so that it can be used in another file (which is what we were using in index.js)).
With that, our server is setup, but nothing is actually happening yet. We need to declare the specific routes for our API. Specifically, we need routes for /add, /subtract, and /check for our Fruits API functionality. We're going to handle that in the next section.
(This might seem convoluted, but when you have a real API with a lot of functions, it's better to understand how to spread everything out so there aren't gigantic files that no one is able to read.)
Set Up The Path Routing
Okay so our server is set up, but we need to set up some routes to handle each of the paths that we in our API. We're going to do separate the routing from the functionality.
First, create a folder named "routes", and then create a folder named "controllers" in the project's root directory. The routes folder will hold files that handle the routing (meaning the mapping of our API route (the URL)) to it's appropriate function. The controllers folder will hold our controller files, which will define the functionality of each of our endpoints in the API. For example, srcmake.com/v1/add is a valid API path. The server will route the request to the v1_routes file, because the request begins with v1. Our v1_routes file will map the add functionality to an add controller in the controllers folder. And that add controller will be a function that adds fruit to our database.
Inside of routes, create a file named "v1_routes.js" and add the following code to it.
The code is very basic. As mentioned, it routes the endpoints ("/fruits/add", as an example) to a controller that will handle the functionality. Notice that we define the HTTP method (post and get) in the routing.
As you can see, we need a controller named fruits in our controllers folder, so create "fruits.js" inside the controllers folder. Add the following code to it:
Our fruits controller exports three functions that do nothing right now. However, these functions are handled correctly by our routing and will eventually be filled out with code that handles our desired API functionality.
Testing
We can test our app right now. We won't do a good test (that comes later), but we will test to make sure that our code is working. In the terminal, type
nodemon
Nodemon will start our server.
Test our server by going to localhost:3000/v1/fruits/check in your web browser. Your terminal should show you an output to the console. (You can try our /add and /subtract methods, but those are POST methods! The browser only initiates GET methods.)
Create Our Desired Functionality For Each Endpoint
Okay so our API is routed beautifully, but it doesn't actually do anything useful yet. We need to beef up of fruits functions by making them send status codes and responses.
It's actually really easy to parse the url parameters, send status codes, and send responses using Node. It's actually INCREDIBLY easy, which is why NodeJS and Express are so popular.
Update our fruits.js file to the following:
The only change is to our "check" function. We first parse the parameters in the API query (which we output to the terminal.) We send a 200 OK status code, and we send a response string back to the user.
If you have it turned off, then use nodemon to turn your server back on.
nodemon
Test our check function, this time giving it a parameter. In your browser, go to http://localhost:3000/v1/fruits/check?fruitname=apple . The terminal should output apple, and the browser should display our string.
That's a demo of how input and responses work, but since we're coding this API specifically for our fruit functionality, let's add exactly what we expect based on the functionality each API function should have.
Update fruits.js one more time, with this code:
For the /add and /subtract functions, we simply return a 200 OK response along with Success. For the check function, we return the fruitname and quantity as json depending on the fruit the user asked for in the parameter.
This code is very incomplete and doesn't handle databases, nor does it handle errors (such as the user giving wrong data), but that can be completed on your own or with some simple coding. I don't want to make this tutorial too long or complex, since it's aimed at beginners.
You can download the project, as it currently stands, here, from github.
Test The API Using Postman
Okay, so our code is complete. Our Node project is 100% done. However, we can't actually test the POST commands in our web browser, so how do we know if they work? We actually can test all HTTP methods in the web browser using an extension named Postman. Find it on your browser's web store and install it.
(Make sure the server is running. If not, use nodemon.)
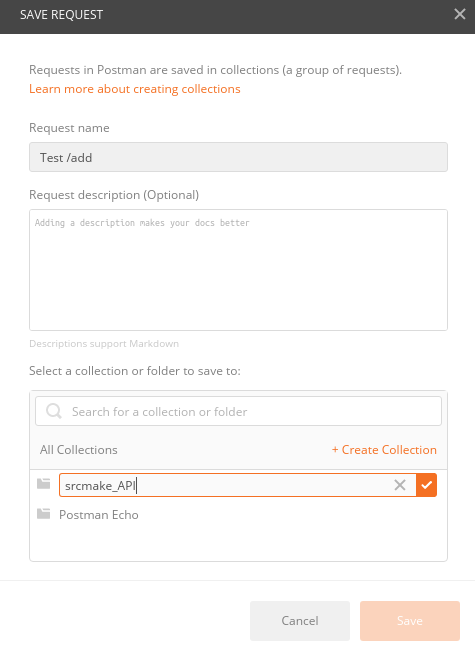
First press the Request button and fill out the form. Add a request name, and create a collection named srcmake_API. Press the checkbox, and click Save.
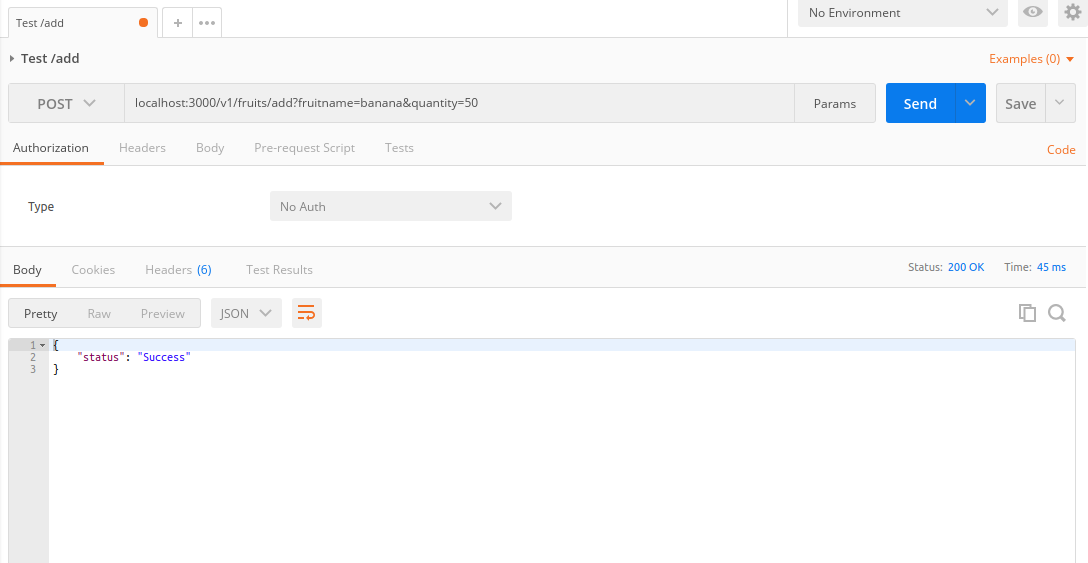
Next, select POST from the dropdown menu, and enter the URL ( localhost:3000/v1/fruits/add ) and press send. You should see some json returned with "Success", as we'd expect with the way our API is currently defined.
And that's it. Play around with testing as many endpoints as you need.
Host the Project In The Cloud (Heroku)
Okay, so we have our API set up. It's a good idea to host our API on a cloud server. Fortunately, Heroku is an awesome cloud service system. Their documentation is great, and it's free! So that's what we're going to use. Feel free to view Heroku's Getting Started tutorial for NodeJS, but I'll be going through the commands so you should be able to do this without the article.
First, we're going to install Heroku (if you don't already have it installed). Run the following for commands in your Ubuntu terminal.
sudo add-apt-repository "deb https://cli-assets.heroku.com/branches/stable/apt ./"
curl -L https://cli-assets.heroku.com/apt/release.key | sudo apt-key add -
sudo apt-get update
sudo apt-get install heroku
You also need git, if you don't have it.
sudo apt-get install git
Next, we're going to log in to Heroku in our terminal. (If you don't have an account, go to their website and make one.)
heroku login
Next, we're going to use the the command line to prepare our heroku app. (Basically, it creates an app heroku's servers, and we need to upload our Node code to the servers.) In the command line:
heroku create
There's one thing that we have to do to make our existing code work for Heroku. We need to let Heroku know what we want to do to start our code. Heroku does this through what's called a Procfile. Create a file named Procfile with the following command (Make sure you're in the root directory of our project folder.):
touch Procfile
Inside of the Procfile, add the following line of code:
web: node index.js
Our code is complete, so now we're going to push our code to Heroku's servers. This is done by using git to push the code to Heroku's code repository for this app. In the terminal in our project's root directory:
git add .
git commit -m "Initial commit."
git push heroku master
And that's it. Our API is officially hosted on Heroku. Use
heroku open
to open our project in the web browser. Make note of the Heroku URL for our API. It should say "Cannot GET /" in the web browser, and that's understandable because our Node Project do anything for the / route. (We're also not a website...just an API.)
Test our API by going to the /check path and finding our how many Apples we have. For my particular Heroku Project, the URL is:
fierce-plains-41411.herokuapp.com/v1/fruits/check?fruitname=apple
Change the base URL to reflect your own heroku url.
Conclusion
We did a lot in this tutorial. We created a base node projected that acted a server. We then added routing for each path of our API. We set that routing to point to specific javascript functions that handled exactly what we wanted to do at that API endpoint. We then used Postman to test the API's functions out, and we
However, there's a lot that we didn't do. We didn't implement any database, and we didn't handle specific errors in our code. We also didn't handle wrong input data from the user, or returning different status codes. All of that can be easily added to this project, but would make this tutorial too long. Perhaps in another tutorial we can go over them, if there's enough interest.
Use this base project as a boilerplate for any APIs that you build in the future. Once again, the github link to the code is here. Spin this project off for whatever API you need to make. Take a look at the Java API tutorial, next. If not, then look at the Postman tutorial for a more in-depth look at postman.
Here's the video where I go through all of the above commands:
Like this content and want more? Feel free to look around and find another blog post that interests you. You can also contact me through one of the various social media channels.
Twitter: @srcmake Discord: srcmake#3644 Youtube: srcmake Twitch: www.twitch.tv/srcmake Github: srcmake Introduction: Programming and Java
This article/series of videos will be aimed for beginning programmers or anyone who wants to learn the Java programming language. Except for the introduction video, each subsequent video is meant to be very short and will be used to simply speak about the programming concept as well as demonstrate the code in Java.
Here are the main points that you need to know:
The Java Series
Instead of article form, this series will be in youtube video series so I can speak clearly and we can learn about programming and Java quickly.
The github link for this series can be found here.
Video 0: Introduction and GoalsVideo 1: Setup and Hello World, Java
Install Java using the following commands:
sudo apt-get install default-jre
sudo apt-get install default-jdk
java -version
If you're using Windows and really want to use a build tool, see one of the appendix sections near the end of the article.
Create a file named MainStartup.java and enter the following code in it:
Compile the code, and then run the executable that's created by using the following two commands:
javac MainStartup.java
java MainStartup
Video 2: Basic Data Types (Variables)
Video 3: For Loops, If Statements
Video 4: Functions
Video 5: Arrays, ArrayLists, and Import
Video 6: Classes
Create a new file for our new class. Name the file "srcMathLibrary.java" and enter the following code into it:
Finally, our MainStartup.java file will test our class out.
Video 7: Object Oriented Programming, Inheritance, Abstract
Some classes act as base classes, that other classes are derived from. For example, Dogs are a type of Mammal, and Mammals are a type of Animal. Since we may want to make classes for Fishes, Amphibeans, Frogs, etc. in the future, a good object oriented approach is to plan classes by a hierchary.
We start with Animal.java, where we define an abstract Animal class (which means that it must be filled in by the derived class before it can be used):
Next, we extend the Animal class by created a new file named Mammal.java for all of our mammals.
Next, we can make a Dog.java file with some Dog class code.
Finally, our MainStartup.java file will create an instance of the Dog class and use its methods.
Video 8: Complex Data Structures
Video 9: Generic Classes/Methods
Generics allow us to code so that one set of code will work no matter which data type the user's data structure comes in. For example, sorting an Array of Integers isn't that different from sorting an Array of Doubles or Longs. The only real difference is data type. To keep our sorting code concise, and to make it easier for the user, we use generics so that our classes (and methods) can handle different data types.
First, we create a helper class in a file named "ArrayUtility.java", to show a generic method that can print any array, regardless of the type.
Next, we create a "GenericClass.java" file for a class that declares a type for the class, so that certain methods and variables can be of that type. (This is what all the data structure classes do.
Finally, our MainStartup.java file will test the generic method and class.
Video 10: Interfaces
Interfaces do the same thing that abstract classes do: they specify certain methods and variables that a derived class must define.
The reason to use interfaces instead of just abstract classes is that a derived class may inherit from multiple interfaces, but only from one class. Variables in interfaces are final (meaning unchangeable).
Create a file named "Dog.java" and add the following code to it.
Test the Dog class in "MainStartup.java".
As mentioned, all variables in interfaces are final. Add the following to line 14 of Dog.java and try to make the program, again.
eatsFood = false;
The code won't compile because you're trying to change a constant variable.
Video 11: AnnotationsVideo A: Building with Maven
Maven is a Java build tool. Here's a reference article. The reason you would use it is because it manages your java dependencies for you. Not necessary for our tiny programs, but in real world huge applications, there are many dependencies with different versions and compatibilities, and so Maven manages all of that for you.
Install Maven with the following command in your terminal. (The next line ensures that it's working.) sudo apt-get install maven mvn -version Okay, before we use Maven, we need to take care of some issues that may come up. The first thing is to make sure that your JAVA_HOME environment is set. (If not, Maven know what what Java compiler to use.) Find your java download location and make sure it's set. On Ubuntu in the command line: cd /usr/lib/jvm ls
Find the name of the folder for your Java installation. In my case, it's "openjdk-8-jdk". Next, set your JAVA_HOME environment variable to point to this path. In the command line:
export JAVA_HOME=/usr/local/openjdk-8-jdk
. /etc/environment
And that should set our environment variable.
Now, make sure that your java is actually up-to-date. This may not be necessary, but for me it was because openjdk-8 didn't install everything the first time I installed it. In the terminal... sudo apt-get install openjdk-8-jdk sudo apt-get upgrade
FINALLY, we can use Maven itself to build a project. Create a new project folder, and cd inside of it. Then type:
mvn archetype:generate
This will start creating a new Maven project. Press enter through everything, but for the following, you need to set some project IDs up.
groupID: com.srcmake.builder
artifactId: ExampleBuild
version: 1.0
For groupID, say com.srcmake.builder. "com" is standard, "srcmake" is the company/website name, and "builder" is the project name. ArtifactID is also the project name. Sort of...The version will be 1.0.
Again, for everything else, just press enter. The project will be made, and there are three important files right now. 1. pom.xml - This file manages our project, from dependencies, libraries, names, versions, etc. This is defines our project. 2. test - Has a bunch of folders for our project's unit tests. 3. src - Holds our project's Java source code.
Let's build our project. In the root directory, in the command line:
mvn clean package
If you see a failure...google it. If you see a success, then great. That just compiled our code from the src folder. It also created a bunch of stuff in the newly made "target" folder. To actually run our Java code, cd into the classes folder and java run our groupID and app entry point.
cd target/classes
java com.srcmake.builder.App
And you should see Hello World.
That was a lot of work, compared to our old method, right?Our command line way of using javac and java to compile is very good for quick programs, but any real project should be built using Maven or Gradle.
For a more in-depth look, see this resource. Video B: Building with Gradle
Gradle is another build tool to manage our Java projects.
To install Gradle, in the command line: sudo add-apt-repository ppa:cwchien/gradle sudo apt-get update sudo apt-get install gradle
Next, we create a project using Gradle. Then we build and run it.
gradle init --type java-application
./gradlew build
./gradlew tasks
./gradlew run
And that's it.
Video C: API Project (Spring)
The spring tutorial can be found here.
Video D: Deploy an API onto a Heroku Instance (Cloud API)
Follow the instructions on heroku's website for beginning a Spring Java project.
To use the Spring commands, download the tool, navigate to bin, and use the spring file as a script to run the command's you need. wget https://repo.spring.io/release/org/springframework/boot/spring-boot-cli/1.5.10.RELEASE/spring-boot-cli-1.5.10.RELEASE-bin.zip unzip spring-boot-cli-1.5.10.RELEASE-bin.zip cd spring-1.5.10.RELEASE/bin ./spring init --dependencies=web myapp
Then copy the myapp folder with our starter project back into our actual project directory.
Like this content and want more? Feel free to look around and find another blog post that interests you. You can also contact me through one of the various social media channels.
Twitter: @srcmake Discord: srcmake#3644 Youtube: srcmake Twitch: www.twitch.tv/srcmake Github: srcmake
To view the youtube video for this tutorial, please click here.
Databases, SQL, and MySQL.
Databases are type of data persistence: information is stored somewhere, to be accessed at a later time. Databases typically store content for websites and apps, such as user information, or even item listings for websites like Amazon, or website URLs and keywords for websites like Google.
MySQL is a relational database type where the data is stored in tables (with columns and rows), and tables can be related to each other and so certain information is correlated. SQL (structured query language) is a programming language that allows operations to be performed on structured databases. There are a few keywords in SQL to perform the queries. It's very important to be able to query for what you need using SQL. MySQL - Setting Up A Local Database
Obviously, the point of a database is to be able to access information easily. Most of the time, however, the database must be accessible over the internet. (Or at least, the APIs that access the database need to access it over the internet.)
However, for testing purposes, we should be able to create a local MySQL database on our computer to test our programs out. We should also be able to export data from a database to give to someone else (called a MySQL dump). We're going to see how we're able to do that in this section. In the Ubuntu 16 command line...
First install SQL from the command line.
sudo apt-get install mysql-server
Choose the password for the root SQL user.
Next, we're going to log in to SQL as root. (Enter the root password when prompted.)
mysql -u root -p
Inside of the MySQL prompt, create a database. We're going to name it "srcmakedb".
create database srcmakedb;
Next, we're going to create a user that has access to this database, so that we don't always have to use root. The user will be named "srcuser" and the password will be "password".
grant all on srcmakedb.* to 'srcuser' identified by 'password';
Now exit SQL, as we don't want to be logged in as the root user anymore.
exit
Next, we log in to SQL as the user that we just created.
mysql -u srcuser -p
Then, we're going to use the database that we created before.
use srcmakedb;
So we're finally inside of a database logged in as a user account. Now we want to make some actual data.
Let's create a table named "customers", that has columns for a customer id (that is a unique integer that acts as the primary key, and auto increments for new customers), a first name, and a last name.
create table customers (customer_id INT NOT NULL AUTO_INCREMENT PRIMARY KEY, first_name TEXT, last_name TEXT);
Enter some data in this table by using an SQL INSERT command.
INSERT INTO customers (first_name, last_name) VALUES ('Bill', 'Johnson');
Add as many customers as you'd like, and make as many tables as you'd like. Honestly, now you can create whatever you want in this database.
To see our table, use the SQL SELECT command.
SELECT * FROM customers;
Make your database as big as you want.
If you ever need to share the database data or upload it somewhere useful, then put all of the SQL data into an "SQL Dump" file.
mysqldump -u srcuser -p srcmakedb > srcmakedb.sql
(Make sure you use this from the command line, not inside of the MySQL prompt. "exit" MySQL before doing this.)
We use the mysqldump command, our username and password, the name of the db, and the name of the file to output too. Additionally, if someone gave us a MySQL dump file, then we could upload it by changing the square bracket to point "in" to the database.
mysqldump -u srcuser -p srcmakedb < srcmakedb.sql
That command will import an SQL dumped in the file named "srcmakedb.sql".
And like that, you can locally use MySQL on your computer to simulate a database. However, to get the best results, you should learn SQL to properly query your database's data. SQL Commands - Cheat Sheet Version
A good resource for learning SQL commands is this one. I use it as a cheat sheet, myself. Read up on what each keyword does, when you need to construct an SQL query, look at the resource to decide which keywords you need.
However, for each SQL keyword, I'm going to give a brief description of what it does, and if you want to see an example, go to that resource that I linked above to see how it's used.
Conclusion
We've gone over MySQL commands and SQL commands, very briefly. Just use this article as a cheat sheet in case you ever need to set a database up, or need to quickly remember how to make a query by determining which keywords matter.
As usual, practice helps learn this, but honestly it's also easy to forget if you haven't used it in a while. That's why this article exists.
Here's the video on this topic where I go into great detail.
Like this content and want more? Feel free to look around and find another blog post that interests you. You can also contact me through one of the various social media channels.
Twitter: @srcmake Discord: srcmake#3644 Youtube: srcmake Twitch: www.twitch.tv/srcmake Github: srcmake
References:
1. www.dofactory.com/sql/intro |
AuthorHi, I'm srcmake. I play video games and develop software. Pro-tip: Click the "DIRECTORY" button in the menu to find a list of blog posts.

License: All code and instructions are provided under the MIT License.
|
