|
To see the video where I walk through all of this code with you, please click here for the youtube video.
Introduction: Manageable Goals
The goal of this blog post is to gain an understanding (with example code) of how C++ Classes and Templates work, as well as being able to build our own custom data structure.
Now, I don't want to go into classes and objects, because that conversation confuses most beginners. For now, you don't need to know about those. We just want to be able to create and use a class, then learn about templates, and then use that knowledge to build our own custom data structure. The following code is also available on github, found here. A Brief Warm-Up: Hello World and Functions
Let's start with a brief warmup.
Here we have a basic Hello World program, where the code for our output is in the function SayHi. Functions are useful in that we can separate some code away from main into it's own special little bundle that we can call whenever we need it. Often, it saves time as well if we use the function multiple times. Not too hard, right? Let's move on to the next step. Classes
Classes are similar to functions in that we create a blueprint for what we'd like to have the class do, and define functions that we can use whenever we'd like.
The following code demonstrates the ability to create a class, that holds some functions and variables, and how we can use that class. Read the comments to see how everything works.
Output:
The favorite number is 7 The favorite number is 20 The sum of 5 and 5 is: 10. Same Class Code, But Separate Files
Okay so we can make and use classes in C++, but to be honest, it's a bit unreasonable (and not that helpful) if you just keep everything in one file. That's not how projects actually work. (And it leads to a lot of clutter and often poor documentation.)
We're going to use the exact same class as above, but we're going to separate the class code into a new file.
Our class code is the exact same as before, copied into a new file named "MyMathLibrary.cpp". The only addition to this file is the "#include<iostream>" and "using namespace std;", since the class's code still needs those.
Next, we need a header file that prototypes the class and functions for when we include them in our main file.
This is pretty much the same code as our class blueprint, but notice how we need to include the "using namespace std;" and the function definition because of our poor choices. (Always define your class functions outside of the class. The class itself should be as clean as possible.)
In a file named main.cpp, we have the same "main" function that we did before. The only difference is that we make a reference to the header file with the #include "MyMathLibrary.h" line. This lets us use that file's code in this one.
Don't forget to add MyMathLibrary.cpp to be compiled if you're using a terminal. The commands for this set of code are: g++ main.cpp MyMathLibrary.cpp -o run ./run
The output is the same as before.
Templates
To advance a bit further, we're going to learn about templates in C++. On a basic/student level, you won't really need to know what templates are. But if you want to actually build a real class, then templates are necessary and is the difference between good coding and poor coding.
A template is basically when you want to use the same code for your functions, but have it work regardless of data type. Let me show you an example.
Output:
Integer addition of 5 and 5: 10 Double addition of 5.5 and 5.5: 11 Long addition of 5 and 5: 10
Notice how we have an "Add" function, there are three different data types that it could return...
Let's use a template this time.
The output is the same as before.
You can see that inside of needing three separate functions, we just needed one. Okay so this seems cool and all but...how does this relate to classes? And are templates even that much better? Well... Our Own Custom Data Structure
Okay so real talk, if you want to be a godly programmer and have everyone use your code...if you want to make a library...if you want to work on real projects...then you need to use classes and templates.
Have you ever used vectors before? Or stacks? Queues? I have another article that goes over how these data structures work, but basically, some pro people made libraries for these data structures, they implemented all the necessary tools (pushing, popping, sorting, etc.) and packaged it up neatly for anyone else to be able to use. Are classes necessary? Yes, the classes are necessary. Are templates necessary? Yes, look at the following code.
The class name is "vector", and since we want a vector of "int"s, the vector class initializes everything for integers. As a user of the vector class, we have a very easy time since the class is so well made.
Since our inspiration is being able to make a library that other people can use, let's make a quick coding example that puts together everything we've learned so far by creating our own data structure. (We'll keep it VERY simple.)
We're going to create our own stack library. Let's start with our stack implementation. We put our code in a file named srcstack.t.hpp (because template code can't be in a separate cpp file):
As you can see, we implement a very simple stack class. We have the necessary stack functions, and we include the "template<class T>" line above each of them since they're part of a class that's a generic type. Our main function simply includes our template .hpp file and demonstrates the use of our new class:
Our code will compile with the standard "g++ main.cpp -o run" command.
The output is: 1 0 0 1 2 3 4 5 Conclusion
We learned how to create classes in C++ (and implement them in separate classes, as is necessary in a professional environment). We also saw how templates work for simple functions, and we extended that to classes to make a generic class that we used to implement our own data structure.
The techniques in this article are fundamental to developing larger projects, and it wasn't that hard, right? Keep practicing and read more blog posts to learn more about programming.
To see this code on github or to download it yourself, please click this link.
To see me walk through all of this code while explaining everything, please watch this video:
Like this content and want more? Feel free to look around and find another blog post that interests you. You can also contact me through one of the various social media channels.
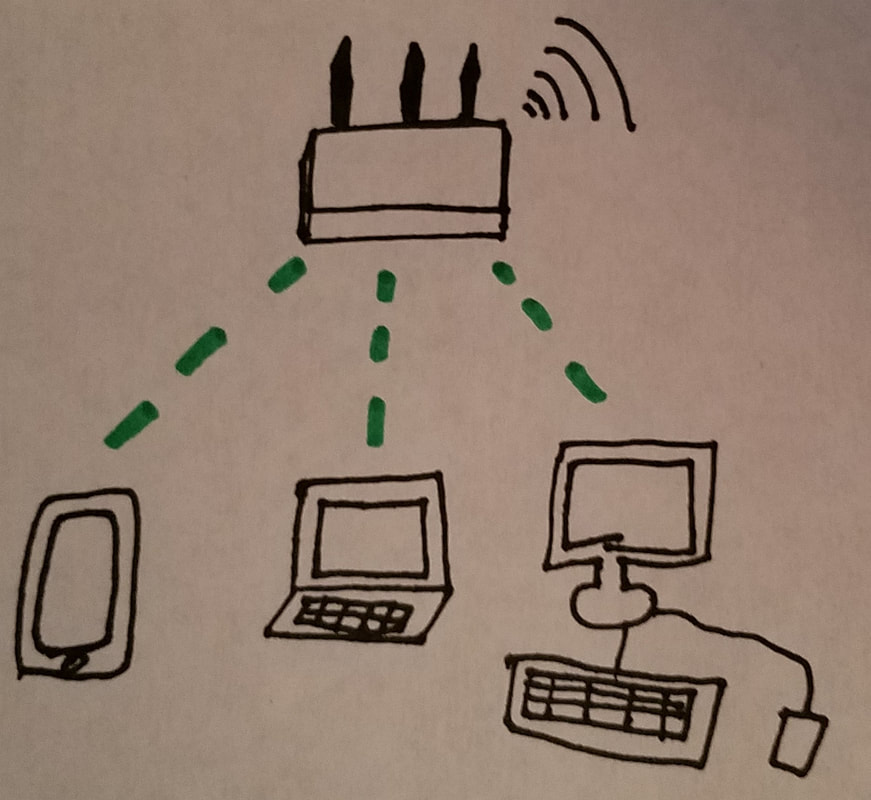
Twitter: @srcmake Discord: srcmake#3644 Youtube: srcmake Twitch: www.twitch.tv/srcmake Github: srcmake To watch the youtube video where I explain everything, please click here. Ever Heard Of Something Called "The Internet" Before?You've heard of the internet right? Of course you have. But do you actually know how it works? We're going to go over an extremely high-level overview of how the internet works. Our Device (The Building Block)
A Community of Devices (Local Networks)
Wires That Connect Communities (The Internet)Routers have the special ability to connect to other routers! (We'll go into the details in a few sections.) That gives communities the ability to talk to each other. 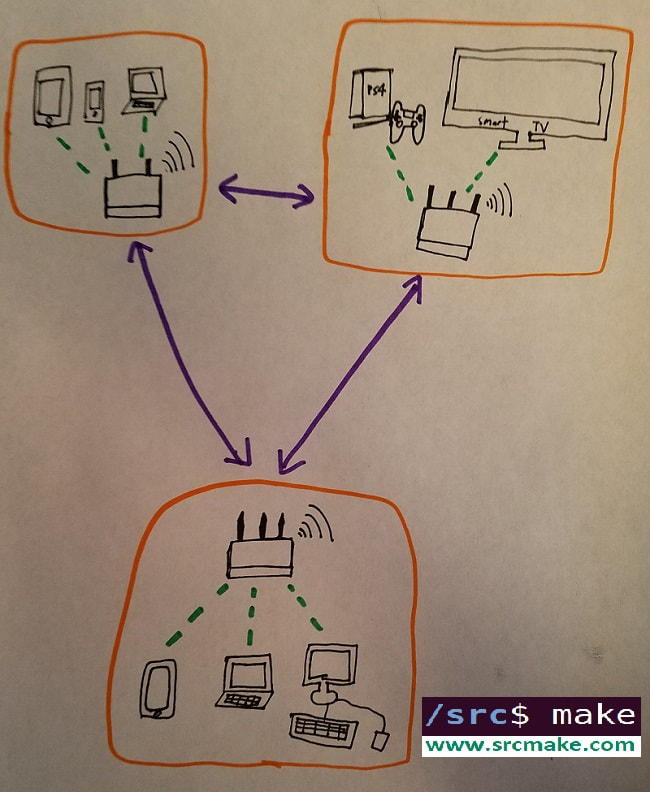 Special Devices (The Real MVPs)It's worth mentioning that there are communities of special devices. These special devices are called "servers". They're just computers that listen for messages from routers, and know how to speak back depending on the situation. For example, at Google's house on the internet, there are a team of special computers that exist only to show the google homepage if someone types www.google.com in their web browser. But how does that process actually work? Communication (In-Depth)Okay, so real talk now: you get the overall principle, right? Your device (and others) are connected locally by routers. Then, you pay an ISP (Internet Service Provider) for internet so that the router is actually connected to a working set of cables that they can speak to other routers. But how does the "speaking" actually happen? Let's take the simplest case. You open your web browser (Chrome, Firefox, or Safari) and type www.google.com into it. What happens is: 1. Your request (from your device) gets sent to the router. 2. The router sends the request to a Domain Name Server (DNS) by saying "hey some device on my network named "srcmake's phone" is asking me to connect to google.com." 3. The DNS says "google.com? Yeah I know that guy. He lives at 8.8.8.8" (an IP Address). 4. Your request goes to to the IP Address (in this case, 8.8.8.8). 5. The router that lives at 8.8.8.8 sees your message, and delivers it to a special computer that Google set up. 7. The Google computer says "hmmm? Oh, this guy just wants the google homepage. Okay let me put everything they need into a package and send it back to them." 8. That package (which contains HTML, CSS, JS, and media files) is sent back to your router. 9. Your router sends the package to your web browser. 10. Your web browser opens the package and displays the results on your screen. 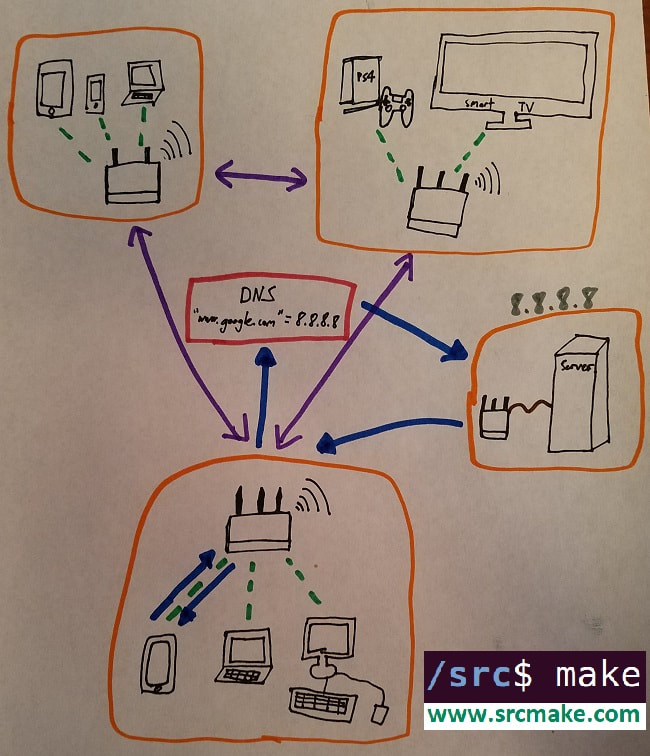 (Sometimes, if the package is too big, then it'll be sent in smaller packages that are delivered a little bit at a time. Those are called "packets" of data.) Conclusion (You're An Expert Now!)That's it. It's that simple. The internet is just a bunch of connected devices that send data to each other. Of course, I made the situation as simple as possible, but you can now officially say that you know how the internet works! To watch a video where I explain all of the concepts for you, please watch the following video: Like this content and want more? Feel free to look around and find another blog post that interests you. You can also contact me through one of the various social media channels.
Twitter: @srcmake Discord: srcmake#3644 Youtube: srcmake Twitch: www.twitch.tv/srcmake Github: srcmake
To watch the youtube video where I explain everything and do the demo, please click here. (Recommended.)
What Are Git Pull Requests
A Pull Request on Git (or any versioning system) happens when someone has made a change to a project and would like the project's repository to be updated to reflect this change.
In another blog post, we talked about Git Patch Files. They're very similar to git pull requests, the difference being that the differences in the project are written to a file, and that file is given to the project owner/manager via email or some other method so that they can go through and apply the changes. Git pull requests, unlike patch files, depend on the specific platform (aka the website, for example: github, gitlab, etc.), for what the owner has to do to apply the changes you made. So why use a Pull Request? It could be easier for the project manager, depending on the repository that the project is hosted on. That's it. How To Raise a Git Pull Request
We're going to be using github as our project's repository host. Because of that, our contribution to the project is going to be super simple. Here's what we have to do:
A Pull Request Example
Let's go through a more concrete example. I've prepared a repository on github that has a project with an error in it. Won't you fix the issue and make a pull request so I can update your changes?
1. Go to the project's repository on github, found here.
2. Click the fork button. 3. Clone the forked repository into a local folder on your computer. In the terminal:
git clone https://github.com/srcmake/pull-request.git
(Of course, your username is different than "srcmake" so make sure you update the command appropriately.
4. Create a separate branch for the changes we'd like to make.
git checkout -b VioletBranch
5. Make the changes in the code. (In the readme.md file, update the word "green" to "blue".)
6. Add, commit, and push the changes to our repository. git add . git commit -m "Fixed the color of violets." got push https://github.com/srcmake/pull-request.git
(Remember to make sure that you're pushing to YOUR forked repository, with your github username.)
7. Go to the main project's repository. (Again, found here.) 8. Navigate to the "Pull requests" tab and click "New Pull Request". 9. Click on the blue "forked repository" button, on the drop down menu choose your forked repository, and choose the VioletBranch branch. Fill out the info and click buttons. 10. Done. Now the project owner (me) will look at the request and apply the changes if necessary. Applying a Pull Request
If you're the project owner and you've had someone make a Pull Request, go to the Pull Requests tab, inspect the pull request info and code changes, and merge it if you'd like too.
To see how this looks, please watch the youtube video where I demonstrate this. Conclusion
Pull Requests are the main way of making a contribution to a project on github. Follow the steps listed in this document to make such pull requests. Now you can contribute to open source projects! Yay.
To see a demo of me performing the pull request procedure, please watch the following video:
Like this content and want more? Feel free to look around and find another blog post that interests you. You can also contact me through one of the various social media channels.
Twitter: @srcmake Discord: srcmake#3644 Youtube: srcmake Twitch: www.twitch.tv/srcmake Github: srcmake
References:
1. http://oss-watch.ac.uk/resources/pullrequest |
AuthorHi, I'm srcmake. I play video games and develop software. Pro-tip: Click the "DIRECTORY" button in the menu to find a list of blog posts.

License: All code and instructions are provided under the MIT License.
|