|
To watch the youtube video that goes over this problem, click here.
Problem Statement
A thief is robbing a museum and he only has a single knapsack to carry all the items he steals.
The knapsack has a capacity for the amount of weight it can hold. Each item in the museum has a weight and a value associated with it. Given the knapsack capacity and the weight and values of the items in the museum, find the maximum value the thief can steal. (Problem on HackerRank.) 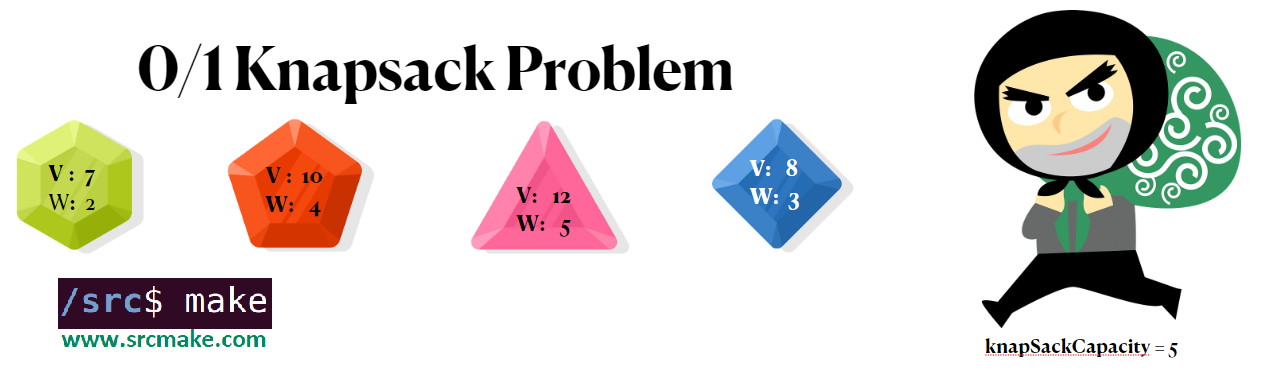
A picture showing the setup of the classic 0/1 knapsack problem. We can solve this using dynamic programming.
Naive Solution: Try All Possible Ways Of Taking Items
The naive solution involves keeping track of the current value and weight of the knapsack, going through each item, and trying both ways of handling the item: we either leave it behind, or pick it up (if we have enough capacity left to hold its weight).
We can code this solution with a simple recursive function. Here's the C++ code for handling the naive knapsack solution:
The time complexity is O(2^numItems) because every recursive loop has two choices.
The space complexity is O(numItems) because each recursive loop travels down to each item and so the stack space goes that high. Dynamic Programming (Best) Solution: Calculate Best Values Possible per Valid Knapsack Weights
The dynamic programming solution, like most DP solution, involves storing the best possible answer while going through each valid solution.
In the case of the knapsack problem, the DP solution is to generate a DP table that stores the maximum value a thief can steal at each item for each valid knapsack weight. We build this table up by going through each item/knapsackWeight combination and taking the max of the choice "take this item, or don't" and choosing the highest value. The dynamic programming C++ code that shows how to solve the knapsack problem is as follows:
The time complexity is O(numItems*knapsackCapacity) because that's the size of the DP table.
The space complexity is O(numItems*knapsackCapacity) because that's the size of the DP table.
Like this content and want more? Feel free to look around and find another blog post that interests you. You can also contact me through one of the various social media channels.
Twitter: @srcmake Discord: srcmake#3644 Youtube: srcmake Twitch: www.twitch.tv/srcmake Github: srcmake
To watch the video going over this topic, click here.
CircleCI - Introduction
CircleCI is a service that detects when your codebase changes and runs jobs (that you define) on the code. It's used for CI/CD.
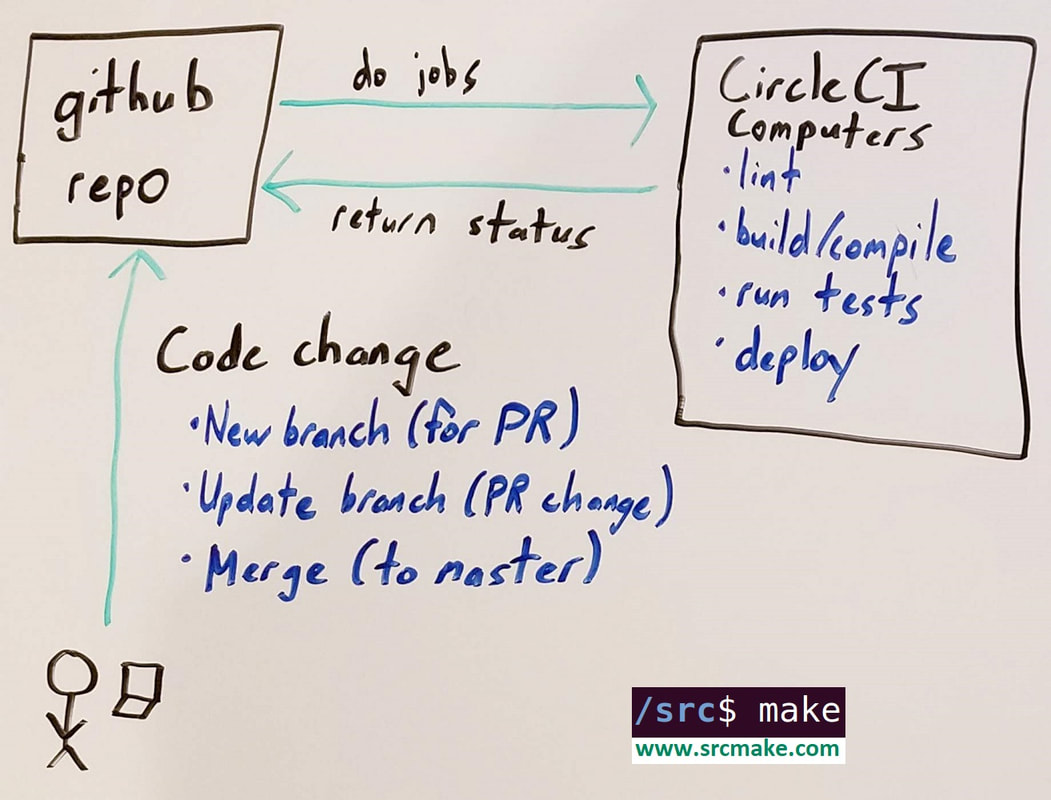
The flow of CI/CD with CircleCI. A code change on github will be detected by CircleCI, and CircleCI will run jobs and return the status of those jobs to github.
The reasons to use CircleCI are:
In this blogpost we're going to create a simple project -> create a repo for that project on github -> setup CI with CircleCI. Our Sample Python Project
Let's create a file named "main.py" and add the following code to it:
We can run this file with the following command (in your terminal):
python3 main.py
Let's also create a file named "main-test.py" to test our main file.
We can run the test using the following command (in your terminal):
python3 main-test.py
Push The Project To Github
Let's create a github repository for this project. Go to github and make a new repo named "circleci-demo".
Now let's push our project (which is currently on our local computer) to the github repo. (Make sure to change the username to be yours. Mine is srcmake.) In your terminal: git init git add . git commit -m "Initial commit" git remote add origin https://github.com/srcmake/circleci-demo.git git push -u origin master Setting Up CI With CircleCI
So our github repo is set up, now we want to enable CI on it by setting up CircleCI.
We need to create a configuration file so that CircleCI will know what we want it to do . Create a folder named ".circleci" and inside of it create a file named "config.yml". mkdir .circleci touch .circleci/config.yml Open ".circleci/config.yml" and add the following code:
Notice that we have two types of tasks (jobs) that we want CircleCI to do: We want to run main.py, and we want to run our tests. We're also specifying that for every branch we want to perform the build job, and the test job.
The official CircleCI Docs can show how to create more complex configurations, but this is a good starting point. We also need to give CircleCI access to our repo so that they're authorized to run these jobs. Go to CircleCI's website, login in with your github account, and authorize them to access your circleci-demo repo that we just created. Now let's push our new config file to github. git add . git commit -m "Adds CircleCI config file" git push CircleCI should detect the code changes and run our build_and_test workflow for our branch. We should be able to see the jobs run on CircleCI's website. (Pro-tip: If there are errors then make sure your config.yml is linted correctly. Use 2 spaces instead of tabs.) The full source code for this project can be found here. Testing That CircleCI Is Working
We have CI running now so let's test it out. Let's add a line to our unit test for our Add function to make sure 5 + 5 is equal to 10.
Check out a new branch:
git checkout -b add-test
Add the following line of code to our TestAdd() function in "main-test.py":
assert Add(5,5) == 10
Push this branch up to github. git add . git commit -m "Adds test to make sure 5 + 5 is equal to 10" git push --set-upstream origin add-test Let's go to our github repo and make a Pull Request for this branch to see if CircleCI is running our jobs. We should see a build job and a test job with green checkmarks since they pass. We have CI working properly. Of course, the useful part of CI (and unit tests) is making sure our codebase is working properly. Let's see what happens if we mess up old code by making our Add function do multiplication instead of tradition. In "main.py" change our Add function to multiply instead of add.
return a * b
Commit this change and push our updated branch to github. git add . git commit -m "Add function now multiplies instead of adds" git push If we look at our Pull Request, we should see that the build step passes since the code is still functional, but now our test fails since 2 * 3 isn't 5. So now we'd know the code change being introduced by this branch is harmful and we shouldn't merge this PR (and CircleCI can use that info to stop other jobs, like making sure not to deploy if the tests fail). Conclusion
CI/CD is very important, and we've seen how to use CircleCI to set up CI. Our project was very simple, but extending the project to more complicated scenarios isn't that hard once you have the base config file. And of course, setting up the CD part is as simple as adding a job to deploy and adding that to our workflow.
A few examples of how to make the most with CI/CD and CircleCI are:
Keep an eye out for a more advanced CircleCI tutorial where we go through setting up the config for a Dockerized project that will also CD to a cloud host like Heroku.
Like this content and want more? Feel free to look around and find another blog post that interests you. You can also contact me through one of the various social media channels.
Twitter: @srcmake Discord: srcmake#3644 Youtube: srcmake Twitch: www.twitch.tv/srcmake Github: srcmake
To watch the youtube video explaining this topic, please click here.
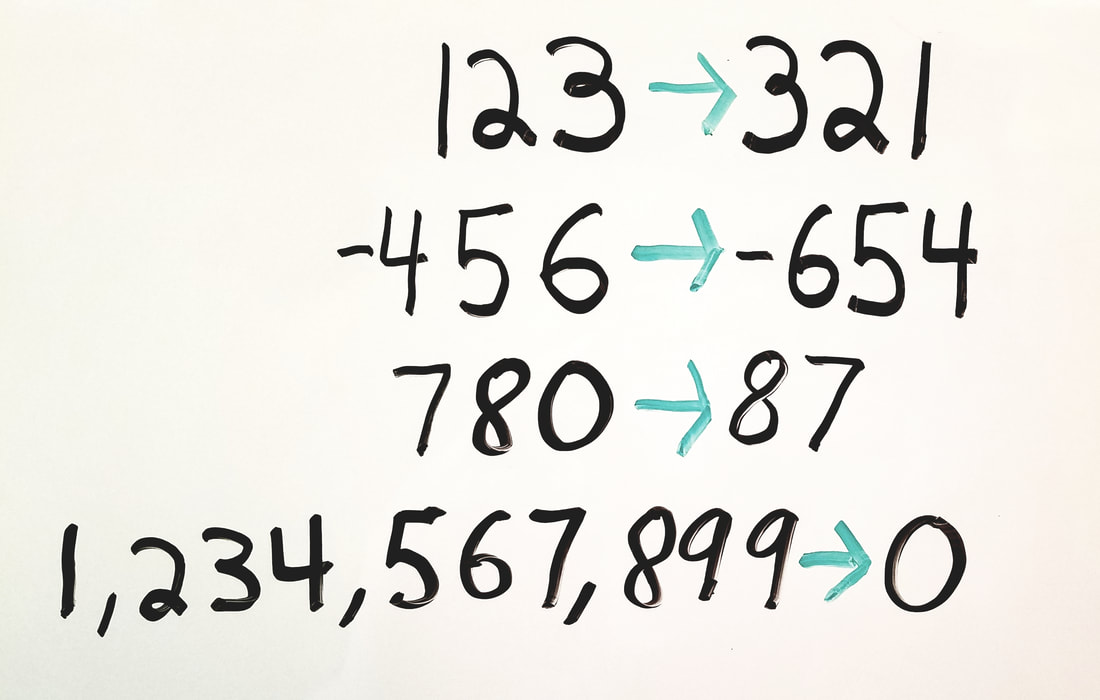
Problem Statement
Given a signed 32-bit integer, reverse its digits. If there's an overflow after reversing, then return 0. (Problem on Leetcode.)
String Solution (without Handling Overflow)
An easy solution would be to convert the integer to its string representation -> reverse that string -> convert the string back to an integer.
In the case of a negative number, we can make the number positive for the string conversion, then make it negative again before returning the final answer.
This is a pretty clean algorithm, but if you run it in Leetcode you'll likely find that your answer is wrong for some solutions. That's because this algorithm is susceptible to integer overflows.
An Integer's Bit Representation
Let's understand how an integer is represented. A 32-bit integer is literally 32 bits (0 or 1) put together in binary format.
The maximum number we can create using 32 bits is by using 32 1's, which equals 4,294,967,295. 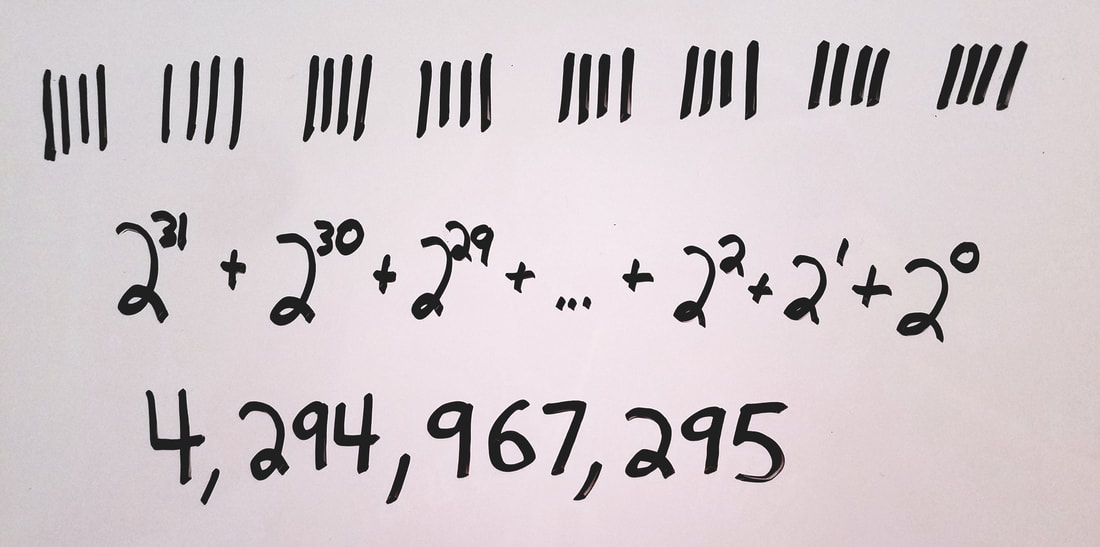
So an unsigned 32-bit integer's maximum value is 4,294,967,295, and the range of numbers you can represent using 32 bits would be [0, 4,294,967,295].
However, a signed integer means we want to be able to include negatives numbers. The easiest way to think about this is that we want to take the maximum value for a 32-bit integer and split it in half, and allow half of the value to count toward negative numbers and the other half to count toward positive numbers. 4,294,967,295 / 2 = 2,147,483,647.5 So the range of a signed integer will be [-2,147,483,648, 2,147,483,647]. String Solution (Handling The Overflow with a 64-Bit Integer)
Looking back at out problem of reversing a signed 32-bit integer, if we tried to reverse 2,147,483,647 then we would get 7,463,847,412 which is definitely an overflow, since it goes over the maximum value a signed integer can be. The problem asks us to return 0 if we overflow.
One easy way to do this is to use a 64-bit (signed) integer to store the reversed value. The range for a 64-bit integer is [-9,223,372,036,854,775,808, 9,223,372,036,854,775,807], which will comfortably fit any flipped 32-bit integer. The only difference in our code is now we work with 64-bit integers, use string_to_long, and have a couple of new if statements to check if we overflowed after reversing.
The time complexity of this solution is O(number of digits). However, this O(N) involves converting the integer to a string, reversing the string, and then converting back to a number. Those are expensive operations.
Mathematical Solution (With 64-Bit Integer)
The string solution works but has expensive operations converting integers to strings and vice-versa. We can optimize by directly using math to convert the number to its reversed form.
Basically, we go through each digit from right to left and make that the digit of our reversed number.
This solution is still O(number of digits) but the operations (modulus and divide) are less expensive.
Mathematical Solution (Only Use 32-Bit Integers)
The truth is in a real interview, if you're asked this question, the interviewer isn't going to let you use a 64-bit integer. It's basically cheating. We can't just throw more hardware (in this case, bits) at all of our problems, and we need to stay within the confines of the types we have. This is especially true for low level programming.
We can eliminate the use of 64-bit integers by, at each step, checking if we're going to overflow if we were to add the next digit.
The time complexity is still O(number of digits), but we added three if-statements at each step, so the code is going to perform slightly worse.
Like this content and want more? Feel free to look around and find another blog post that interests you. You can also contact me through one of the various social media channels.
Twitter: @srcmake Discord: srcmake#3644 Youtube: srcmake Twitch: www.twitch.tv/srcmake Github: srcmake |
AuthorHi, I'm srcmake. I play video games and develop software. Pro-tip: Click the "DIRECTORY" button in the menu to find a list of blog posts.

License: All code and instructions are provided under the MIT License.
|
