|
To watch the youtube video where I walk through this process with you, please click here.
Introduction
In the previous blog post, we introduced Actian Vector and know that it's a high performance database. In this blog post, we're going to use Actian Vector locally on our own computer, download a dataset, and load that dataset into Actian. Then we'll see how we can query the data with simple SQL commands.
Let's start by looking at our computer specs. Windows and Linux Work - I'm Using An Ubuntu 16.04 Virtual Machine
Both Windows and Linux are officially supported by Actian Vector. To do this tutorial, I'll be personally using Ubuntu 16.04, run on a virtual machine. The dataset we're using will need 130 GBs of space for that, so make sure you allocate/have enough space yourself, if you're following along with the full dataset. (You can also use a partial dataset if you have less space.)
Install Actian Vector
To install Actian Vector, simply download the Community Edition from their website, found here. Fill out the form, and you'll be directed to the downloads page. Click the Linux 64 bit Database Server with ODBC & JDBC Drivers" Download Here button.
When the download is complete, unzip the file. Then, inside of the unzipped folder's directory, open a terminal. Then in the termal, run the following command: sudo apt-get update sudo apt-get install libaio1 sudo ./install.sh
Enter a password, and "y" when needed to say yes, and press enter to scroll through the license. The installation will take about a minute. (Make sure you remember the password you enter at the end, we'll need it for the next step.)
Actian is now installed, but when we installed it, we created a new Linux user named "actian", which is authorized to use our database. In our terminal, let's switch to that user.
su - actian
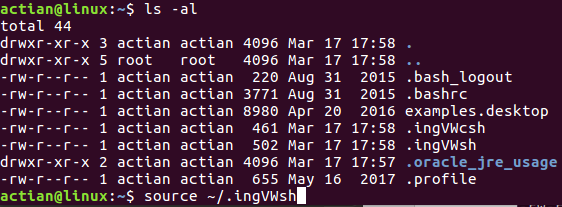
The password is the one you specified before. Finally, we need to source the environment variable to use Actian in the command line. Find the ".ingXXsh" file in your ~/ folder, and source it. For example, on my machine, it looks something like this:
So navigate to that folder, inspect the ".ingXXsh" (where XX in my case is actually "VW", and source it. The followings commands will help, just make sure to change the last command to whatever your .ing__sh is.
cd ~
ls -al
source ~/.ingVWsh
Make sure the service is started with the following command:
ingstart
Once completed, you have Actian Vector installed locally on your machine! Now we just need to get some data, and we can start playing with Vector.
(Don't close this terminal that's logged in to Actian, by the way. We'll use it after the next step.)
Download The Dataset
As mentioned in the previous blog post, our dataset is going to be the US Deparment of Transportation's data about airplane travel. You can download the dataset here. For "Product", select "Community Projects" in the drop-down menu. For "RELEASE" choose "Datasets". For "Platform" choose "Linux x86". Then scroll down and click on the "Airline On-Time Performance Data (Oct 1987 - Jan 2017)" widget. Scroll down a bit more and click the "HTTP" download button. (Log in if it asks you too.) Then wait for the download to complete. Unzip the download. It's pretty big, so it will take some time.
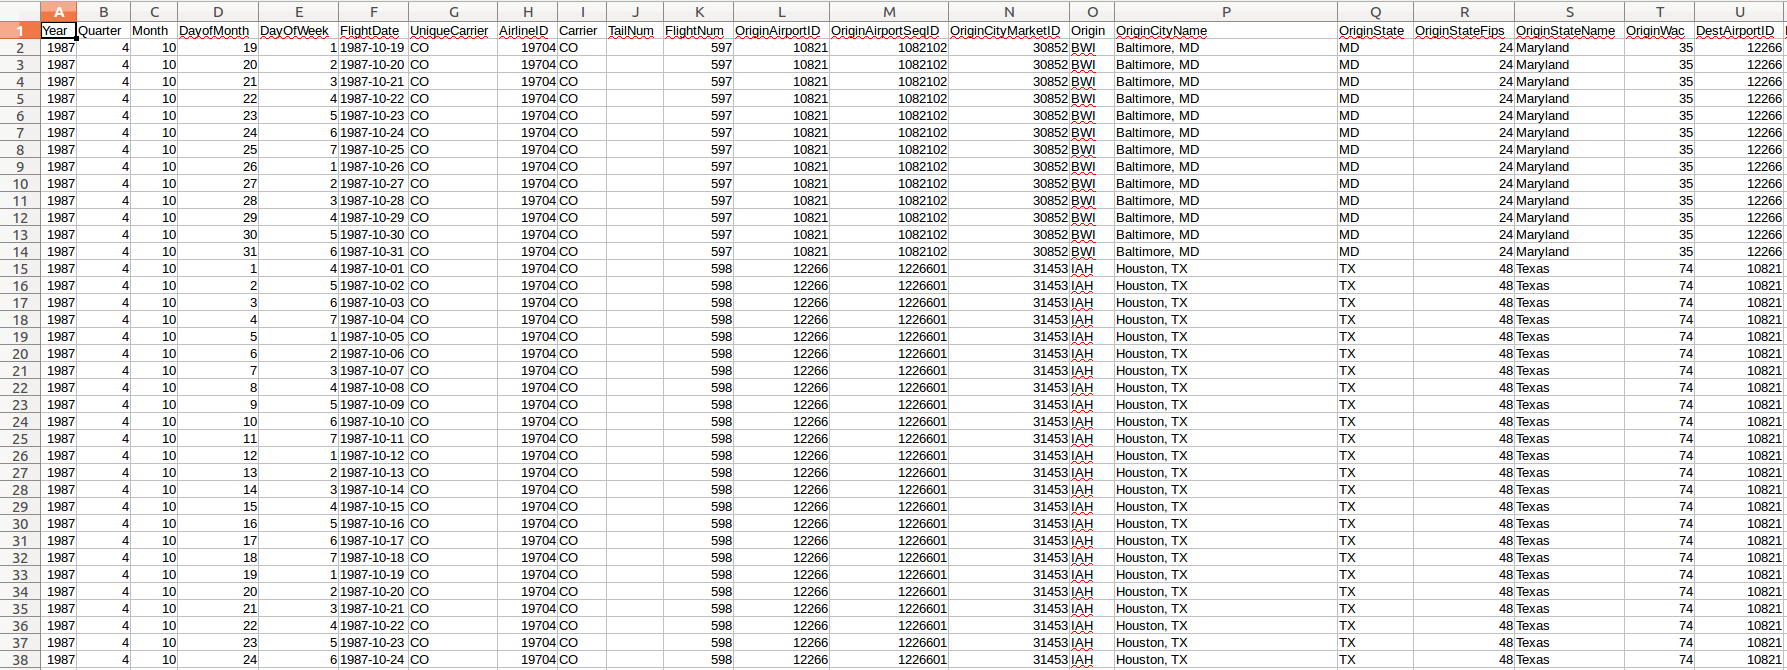
The dataset is a bunch of spreadsheets, formatted as such:
We'll go into more details about the data in the next section. For now, let's worry about getting this data from the spreadsheets into Vector.
Load The Dataset into Actian Vector
So at this point, we have Actian Vector installed on our computer, and we have a bunch of spreadsheets with airline data. We want to load this data into an Actian Vector database.
Back in our terminal where we're logged in as the user "actian" (and if you're not in that terminal, redo the previous steps to be logged in as actian in a terminal), first we're going to cd into directory our downloaded spreadsheets got extracted (which for me is directly in the /Downloads folder of my "srcmake" directory). Then we're going to create a database using Vector named "ontimedb". cd /home/srcmake/Downloads createdb ontimedb
Now we need to create a table to store all of our data into. We have a LOT of columns, so let's put our SQL command into a file. Create a file named "command.sql" in the directory where you extracted the CSV files.
Open "command.sql" and add the following SQL command to it:
CREATE TABLE ontime
        (
        Year INTEGER,
        Quarter INTEGER,
        Month INTEGER,
        DayofMonth INTEGER,
        DayOfWeek INTEGER,
        FlightDate VARCHAR(255),
        UniqueCarrier VARCHAR(255),
        AirlineID INTEGER,
        Carrier VARCHAR(255),
        TailNum VARCHAR(255),
        FlightNum INTEGER,
        OriginAirportID INTEGER,
        OriginAirportSeqID INTEGER,
        OriginCityMarketID INTEGER,
        Origin VARCHAR(255),
        OriginCityName VARCHAR(255),
        OriginState VARCHAR(255),
        OriginStateFips VARCHAR(255),
        OriginStateName VARCHAR(255),
        OriginWac VARCHAR(255),
        DestAirportID INTEGER,
        DestAirportSeqID INTEGER,
        DestCityMarketID INTEGER,
        Dest VARCHAR(255),
        DestCityName VARCHAR(255),
        DestState VARCHAR(255),
        DestStateFips VARCHAR(255),
        DestStateName VARCHAR(255),
        DestWac VARCHAR(255),
        CRSDepTime INTEGER,
        DepTime INTEGER,
        DepDelay INTEGER,
        DepDelayMinutes INTEGER,
        DepDel15 INTEGER,
        DepartureDelayGroups INTEGER,
        DepTimeBlk VARCHAR(255),
        TaxiOut INTEGER,
        WheelsOff INTEGER,
        WheelsOn INTEGER,
        TaxiIn INTEGER,
        CRSArrTime INTEGER,
        ArrTime INTEGER,
        ArrDelay INTEGER,
        ArrDelayMinutes INTEGER,
        ArrDel15 INTEGER,
        ArrivalDelayGroups INTEGER,
        ArrTimeBlk VARCHAR(255),
        Cancelled INTEGER,
        CancellationCode VARCHAR(255),
        Diverted INTEGER,
        CRSElapsedTime INTEGER,
        ActualElapsedTime INTEGER,
        AirTime INTEGER,
        Flights INTEGER,
        Distance INTEGER,
        DistanceGroup VARCHAR(255),
        CarrierDelay VARCHAR(255),
        WeatherDelay VARCHAR(255),
        NASDelay VARCHAR(255),
        SecurityDelay VARCHAR(255),
        LateAircraftDelay VARCHAR(255),
        FirstDepTime VARCHAR(255),
        TotalAddGTime VARCHAR(255),
        LongestAddGTime VARCHAR(255),
        DivAirportLandings VARCHAR(255),
        DivReachedDest VARCHAR(255),
        DivActualElapsedTime VARCHAR(255),
        DivArrDelay VARCHAR(255),
        DivDistance VARCHAR(255),
        Div1Airport VARCHAR(255),
        Div1AirportID VARCHAR(255),
        Div1AirportSeqID VARCHAR(255),
        Div1WheelsOn VARCHAR(255),
        Div1TotalGTime VARCHAR(255),
        Div1LongestGTime VARCHAR(255),
        Div1WheelsOff VARCHAR(255),
        Div1TailNum VARCHAR(255),
        Div2Airport VARCHAR(255),
        Div2AirportID VARCHAR(255),
        Div2AirportSeqID VARCHAR(255),
        Div2WheelsOn VARCHAR(255),
        Div2TotalGTime VARCHAR(255),
        Div2LongestGTime VARCHAR(255),
        Div2WheelsOff VARCHAR(255),
        Div2TailNum VARCHAR(255),
        Div3Airport VARCHAR(255),
        Div3AirportID VARCHAR(255),
        Div3AirportSeqID VARCHAR(255),
        Div3WheelsOn VARCHAR(255),
        Div3TotalGTime VARCHAR(255),
        Div3LongestGTime VARCHAR(255),
        Div3WheelsOff VARCHAR(255),
        Div3TailNum VARCHAR(255),
        Div4Airport VARCHAR(255),
        Div4AirportID VARCHAR(255),
        Div4AirportSeqID VARCHAR(255),
        Div4WheelsOn VARCHAR(255),
        Div4TotalGTime VARCHAR(255),
        Div4LongestGTime VARCHAR(255),
        Div4WheelsOff VARCHAR(255),
        Div4TailNum VARCHAR(255),
        Div5Airport VARCHAR(255),
        Div5AirportID VARCHAR(255),
        Div5AirportSeqID VARCHAR(255),
        Div5WheelsOn VARCHAR(255),
        Div5TotalGTime VARCHAR(255),
        Div5LongestGTime VARCHAR(255),
        Div5WheelsOff VARCHAR(255),
        Div5TailNum VARCHAR(255)
        );\g
The SQL command above will create a table named "ontime" and add columns for each of the specified column names.
sql ontimedb < command.sql
You should get a "Your SQL statements have been executed" message. Now let's just quickly check that the table was created.
The following three commands will turn the terminal into an SQL session for our ontimedb, will select the table, and then exit the SQL session. sql ontimedb SELECT * FROM ontime;\g \q
So our database (ontimedb) was made, and our table (ontime) was created, but now we have a bunch of spreadsheet files with data that we want to load into our table. Luckily, Actian prepared a script to load these spreadsheet files for us. The following command (in your Actian terminal) will do so.
source loadall.sh
(Notice that the loadall.sh script simply makes "vwload" commands, which are commands to automatically load files into a table, given the tablename and database name. To learn more, or for more loading methods, click here.)
After a while, our dataset will be loaded into our database (table). To verify this, execute the following commands to look at our table.
sql ontimedb
SELECT COUNT(*) FROM ontime;\g
SELECT TOP 5 * FROM ontime;\g
\q
The first command takes us into an SQL session in ontimedb. The next line counts how many rows of data we have. The third line shows us the first 5 rows. And the last line exits the SQL session to go back into our Actian linux terminal.
Let's play a bit more with the data.
Querying The Database From The Command Line
We saw that we can query the data inside of the SQL shell, but what about queries from the command line, or from code inside of a programming language? This, too, is possible with Vector.
We're going to use the command line to run two SQL queries, and output the results to a file. First, create a file named "query.sql" in the directory you're working in (which should still be where the csv files got unzipped).
Open "query.sql" and add the following two SQL statements:
SELECT COUNT(*) FROM ontime WHERE (Cancelled!=0);\g
SELECT COUNT(*) FROM ontime WHERE (Cancelled=0);\g
The first query will count how many cancelled flights there were. The second query will count how many flights departed successfully.
In your terminal (where you're logged in as Actian), run the following command:
sql ontimedb -S <query.sql >/home/actian/out.txt
The command will perform the query inside of a file named "query.sql" on the ontimedb database. -S will remove any extra info and will show only the SQL output, and the result will get piped to the file at "/home/actian/out.txt". For documentation on SQL, read the guide.
Our "out.txt" file will have two numbers in it: the number of cancelled flights, and the number of successful flights.
And as such, we can now work with this data in any programming language (or with any tool) of our choosing, as it's in a simple file.
Conclusion: What's Next
We've successfully installed Actian Vector locally on our computer, and we've loaded a dataset into a database. We can easily query the database with standard SQL commands, and it's fast and efficient.
In another blog post, we'll look at visualizing this data (the airplane dataset, specifically), by making a special dashboard for it with some interesting insights. In further blog posts, we'll be looking at using Actian Vector on AWS and Azure. Working locally is great for testing, but Vector is also easily deployed cloud services Azure and AWS, since there are already apps to use Vector in the marketplaces for those services.
Like this content and want more? Feel free to look around and find another blog post that interests you. You can also contact me through one of the various social media channels.
Twitter: @srcmake Discord: srcmake#3644 Youtube: srcmake Twitch: www.twitch.tv/srcmake Github: srcmake Comments are closed.
|
AuthorHi, I'm srcmake. I play video games and develop software. Pro-tip: Click the "DIRECTORY" button in the menu to find a list of blog posts.

License: All code and instructions are provided under the MIT License.
|


