|
To see the youtube walkthrough of this tutorial, please click here.
Introduction
Hyperledger is an open source collaborative effort created to advance blockchain technologies. The Hyperledger organization has a number of projects (10 right now) for various blockchain solutions, such as smart contract engines, permissioned networks, querying for information inside a ledger, etc.
Iroha Terminology and Concepts
There are a few terms we need to know to get a good grasp on Iroha. There's an official core concept list here, but we'll go over the important ones right here in this post. (We'll assume you know the basics of blockchain. If not, read this blog post quickly.)
To begin learning the terms and concepts, we'll setup an example scenario, which we're going to model on the blockchain.
We own a farm, named "srcmakeFarm". We have some sheep, corn, a barn, and some other farm stuff on our land. We also have a few workers on our farm.
With that in mind, let's see the Iroha terminology that we need to model our farm.
There are a few more terms that we could learn, but they're a bit advanced for this getting started guide, so we'll talk about them in another blog post.
Creating An Iroha Network
We're going to create a basic Iroha network, following the Iroha Getting Started guide found here.
Any Unix style terminal will work, but I've personally used Linux (Ubuntu 16.04). The first thing we need to do is install Docker if you don't already have it. (If you've never used Docker before, you can check out this blog post, but finish this blog post first.) The commands to install Docker on Ubuntu from the terminal are: sudo apt-get install curl curl -fsSL https://download.docker.com/linux/ubuntu/gpg | sudo apt-key add - sudo add-apt-repository "deb [arch=amd64] https://download.docker.com/linux/ubuntu $(lsb_release -cs) stable" sudo apt-get update apt-cache policy docker-ce sudo apt-get install -y docker-ce Next, we need to create a docker network. We'll name it "srcmake-iroha-network".
sudo docker network create srcmake-iroha-network
Next, we're going to add PostgreSQL to our network. sudo docker run --name some-postgres \ -e POSTGRES_USER=postgres \ -e POSTGRES_PASSWORD=mysecretpassword \ -p 5432:5432 \ --network=srcmake-iroha-network \ -d postgres:9.5 Next, we'll create a volume of persistant storage named "blockstore" to store the blocks for our blockchain.
sudo docker volume create blockstore
Now, we need to configure Iroha on the network. Download the Iroha code from github. (And install git if you don't already have it.) sudo apt-get install git git clone -b develop https://github.com/hyperledger/iroha --depth=1 We're going to use the Iroha configuration that's been prepared as an example to run the Iroha docker container. sudo docker run -it --name iroha \ -p 50051:50051 \ -v $(pwd)/iroha/example:/opt/iroha_data \ -v blockstore:/tmp/block_store \ --network=srcmake-iroha-network \ --entrypoint=/bin/bash \ hyperledger/iroha:x86_64-develop-latest Now we're going to actually run Iroha.
irohad --config config.docker --genesis_block genesis.block --keypair_name node0
And now our Iroha blockchain is running in our terminal, so don't close it! Next, we're going to play with Iroha by doing some transactions. Interacting with our Iroha Network
So we have our Iroha network running, so let's make some transactions. If you look at the code for our genesis block, you can see that some commands were invoked to help get us started, so we're going to use those.
To interact with Iroha, we're going to use the command line tool. Open a new terminal (don't close the one with our Iroha network!) and attach the docker container to our terminal.
sudo docker exec -it iroha /bin/bash
We should be inside the docker container's shell. Launch the iroha-cli tool and login as admin@test.
iroha-cli -account_name admin@test
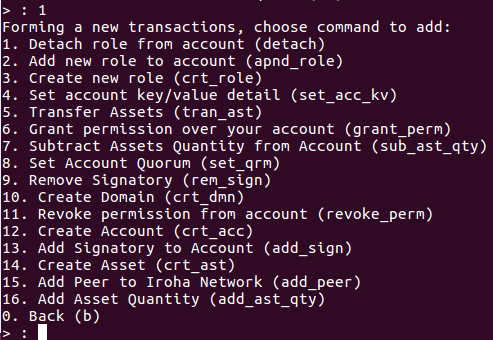
You should see the picture above. We're inside the Iroha CLI, and there are a certain number of things we can do.
Type 1 and press enter to start a new transaction.
1
There are a lot of commands that we can do. Let's try to model our farm a bit. Let's first create the domain.
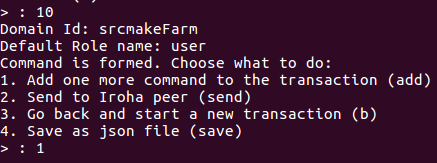
Type 10 and create an domain with the id "srcmakeFarm". The default role name is role (list of permissions) the domain has, and we'll give it a "user" role that was created for us as part of this example. 10 srcmakeFarm user
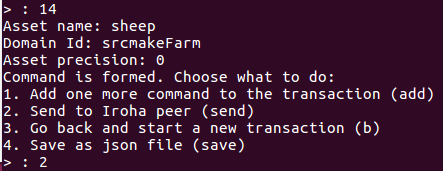
Next, let's add some sheep to our farm. Type 1 to add one more command to the transaction. Then type 14 to create the sheep asset. It belongs to the domain srcmakeFarm, and the precision is 0 (meaning we don't allow decimals. Sheeps only come in whole numbers.)
1
14
sheep
srcmakeFarm
0
2
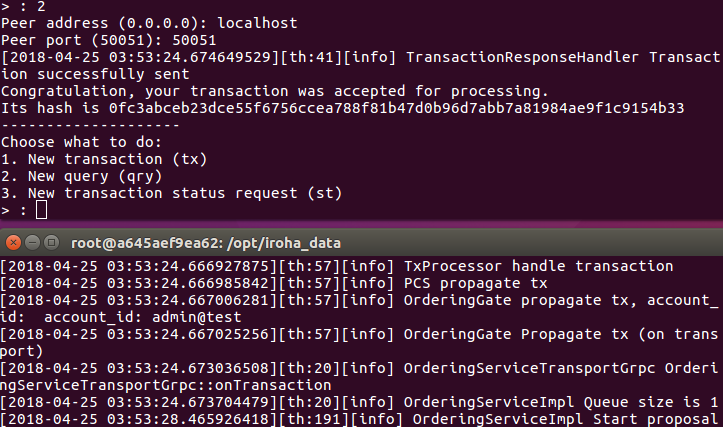
Our farm looks pretty good, so let's send this to Iroha peer (the network) by typing 2. The peer address is "localhost" and it's on port "50051".
localhost
50051
You can see we get a hash for the transaction, and back in our Iroha network terminal, stuff happens (because we pushed a transaction onto the blockchain. More on those details in another blog post.)
Okay, so we have our srcmakeFarm and created an asset named sheep. Let's add 50 sheep (and give it to admin@test since we haven't made our own account).
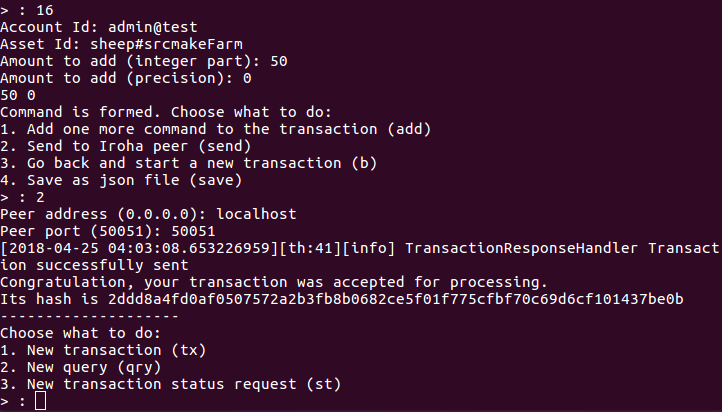
Type 1 to make another transaction. Type 16 to add some quantity to an asset. The account is "admin@test", the asset is "sheep#srcmakeFarm" (notice the #domain), there are 50 sheep, and the precision is 0. Type 2 and send it to the localhost at 50051.
1
16
admin@test
sheep#srcmakeFarm
50
0
2
localhost
50051
Another successful transaction. Now let's make a sample query.
Making A Query
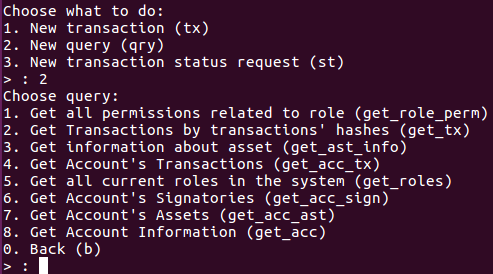
Let's check how many sheep we have. Type 2 to make a new query this time.
2
There are lots of query types. We're going to query a particular account's assets, so type 7.
The account that owns the sheep is "admin@test", the asset we need is "sheep#srcmakeFarm". Send the query request to "localhost" at port "50051". 7 admin@test sheep#srcmakeFarm 1 localhost 50051
You can see the query results immediately. admin@test owns 50 sheep from srcmakeFarm.
And that's how easy querying is! Conclusion
In this blog post, we learned about some basic Hyperledger Iroha terminology and concepts, and applied it by creating our own Iroha network. We also modeled our farm on the network.
Of course, we could have done a lot more and built a much more complex model. Feel free to explore the other possible transactions. And while we worked from the Iroha command line, we could have interacted with Iroha using some of the native programming language libraries. Of course, Iroha is open source and is written in C++, so you can see how it works right on github. In future tutorials, we'll look at creating more in-depth models, deploying Iroha on more than just our computer, using Iroha from a programming language, and contributing to the project itself.
The youtube walkthrough of this tutorial:
Like this content and want more? Feel free to look around and find another blog post that interests you. You can also contact me through one of the various social media channels.
Twitter: @srcmake Discord: srcmake#3644 Youtube: srcmake Twitch: www.twitch.tv/srcmake Github: srcmake Comments are closed.
|
AuthorHi, I'm srcmake. I play video games and develop software. Pro-tip: Click the "DIRECTORY" button in the menu to find a list of blog posts.

License: All code and instructions are provided under the MIT License.
|

