Introduction
In the previous article, we had an Introduction to Machine Learning. That article was just to learn about the concepts, but now we're going to be looking at some very simple coding examples using a basic python library.
We're going to start by installing the necessary python libraries (and python if we don't already have it), and then we'll look at some basic code for a simple example. Installation - Python and SKLearn
First, install Python, Pip, and Pipenv if you don't already have it. (If you don't know about Python virtual envionments, read this quick article and come back here.) In an Ubuntu 16.06 terminal:
sudo apt-get install python3
sudo apt-get install python3-pip
sudo pip3 install pipenv
Next, in your project folder (create it if you didn't already), install the libraries we need using pipenv.
pipenv install sklearn
pipenv install numpy
pipenv install scipy
Out installation is complete, hopefully. Test it out.
Start Our Project - Make Sure Our Installation Works
We need to make sure that our installation works. In the project folder (which you should already be in, since we were installing our libraries into the folder using pipenv before), create a file named "main.py".
touch main.py
Add the following code to main.py.
You can see that the code just imports our sklearn library, and prints hello world. We need to run this file through pipenv.
pipenv run python3 main.py
Hopefully you see the "Hello world from srcmake, machine learning" in your console. If you did, great, our project is set up.
Machine Learning Coding - A Basic Classifier
Our library (and project) is working, so now we just need to add some useful machine learning code to our file.
We're going to start things off with a very basic classifier. Let's imagine that we have some features and labels. For example, let's say that for a certain height (x) and weight (y) pair, we know if someone is physically fit (red) or not physically fit (blue). We can draw this out on a graph. 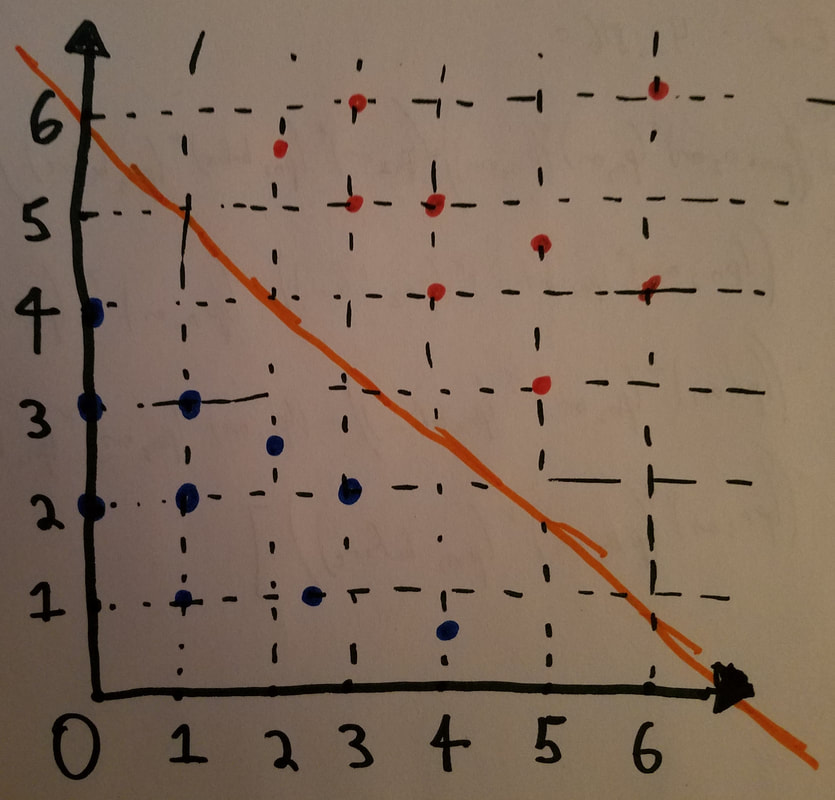
Notice that the points divide themselves in such a way that we can draw an orange line between them. It separates the points nicely.
Of course, this is a very crude example, but we can see that the "classifier" in this case can easily determine if someone is physically fit or not by plotting their height and weight, and then seeing which side of the line the point will be on.
The actual "technique" that we're going to use to determine this line will be the machine learning algorithm "Naive Bayes". Let's write some code for it, in simple Python.
We simply import our libraries, declare our coordinates in the X variable, declare our labels in the Y variable, we create a classifier, and we train it. Then we print two predicted values.
pipenv run python3 main.py
It should print [0] [1], which is what we expect. Run the code with:
Conclusion
We did it! We used Python to train a machine learning classifier. Of course, this was just a simple line, but if the training data was more complicated, we'd have to tune some parameters to make the classifier better.
In the next article, we'll look at a cheat sheet that talks about different machine learning techniques/algorithms and when it's best to use them.
Like this content and want more? Feel free to look around and find another blog post that interests you. You can also contact me through one of the various social media channels.
Twitter: @srcmake Discord: srcmake#3644 Youtube: srcmake Twitch: www.twitch.tv/srcmake Github: srcmake Comments are closed.
|
AuthorHi, I'm srcmake. I play video games and develop software. Pro-tip: Click the "DIRECTORY" button in the menu to find a list of blog posts.

License: All code and instructions are provided under the MIT License.
|
