|
To watch the youtube video where I go over this tutorial, please click here.
Introduction: IBM Bluemix/Watson
IBM has their own cloud hosting service called Bluemix. Similar to how AWS and Microsoft Azure offer various services related to hosting servers/databases on the internet, Bluemix also offers their own services.
Watson is the name of IBM's Artificial Intelligence program, which most famously went on Jeopardy and answered a lot of trivia questions. However, lately Watson is famous for being able to power various services, such as chatbots. In this article, we're going to look at the most basic Watson service: it's Tone Analyzer. We're going to set the Tone Analyzer service up on IBM's Bluemix website (completely free), and we're going to make a simple Node project that uses the Tone Analyzer. The Tone Analyzer
The first thing we need to do is create the actual Tone Analyzer. Start by registering an IBM Bluemix account if you don't already have one. (No credit card needed.)
Next, we're going to create a Tone Analyzer project. Go to the Tone Analyzer page on IBM's website and click Get started free. Log in with your Bluemix account if necessary.
You should now be on a page to create the new Tone Analyzer project. (Click here if you aren't on that page.)
Enter "srcmakeTones" for the project name, make sure "Lite" is selected from the drop down menu, and click "Create Project". 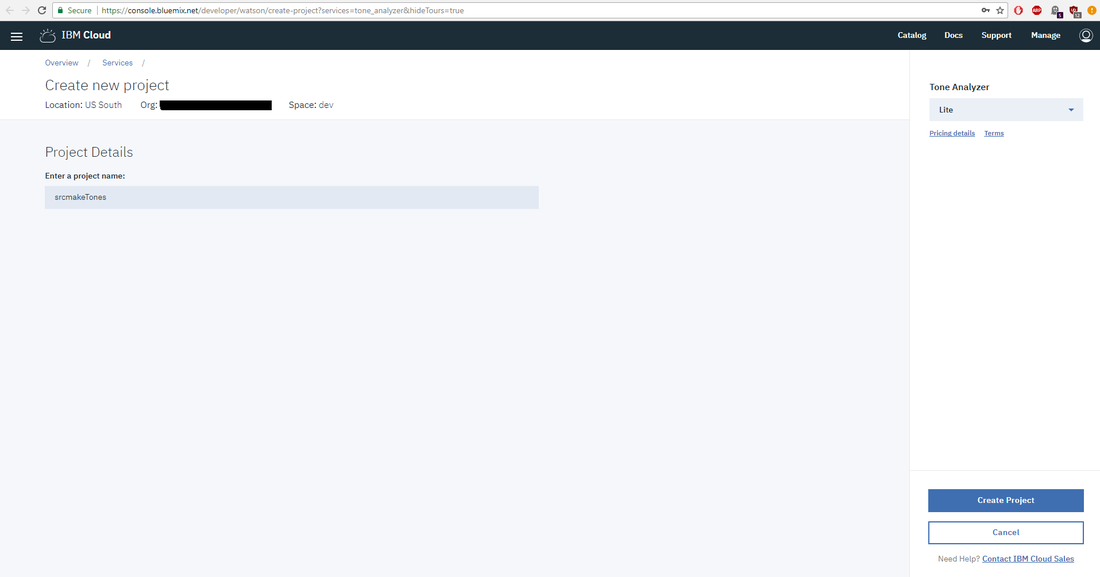
Click that "Show" button next to the credentials. We're going to need that username and password later, so don't close the page yet.

That's it. We created the service on Bluemix so now we can use the Tone Analyzer (by using our credentials). We could use curl commands to test this out, but let's create a Node project and do this the right way.
Start With A Simple Node Project
We're going to create a basic node project that uses the Tone Analyzer on a string. On your computer, make a folder for our sample project.
Start by making a basic node project. In the terminal:
npm init
For the package name, enter "srcmaketone". The version is "1.0.0". Press enter for the description. The entry point is "index.js". For everything else, just press enter.
Our project now consists of the package.json file. But let's also create the entry point, index.js file, and also a config.js file to store our credentials. In your terminal. touch index.js touch config.js
Open the "config.js" file and enter the following code to it:
Fill in the username and password that we got from the previous section. Save and close the file.
Watson Has His Own Node Library, And Some Sample Code
So we have a basic node application, and our Tone Analyzer credentials are stored in our config file, but we need to write some code that uses Watson's Tone Analyzing power. Conveniently, Watson has his own Node library that we're going to use. Install it with the following command.
npm install --save watson-developer-cloud
Preparations are complete, so we can start coding. Before that, though, notice the API reference on IBM's website. It has some useful code that we're going to use.
In our index.js file, add the following code:
The code is pretty basic. We use our Watson library and our config file. The text that we analyze is a string from The Great Gatsby. We format that text as valid json. We then create the tone analyzer, and use it to analyze our text.
Test It Out
Our project is all set, now all we need to do is test it out. To do so, in your terminal:
node index.js
The output looks something like this:
The tone analysis for 'In my younger and more vulnerable years my father gave me some advice that I’ve been turning over in my mind ever since. “Whenever you feel like criticizing any one,” he told me, “just remember that all the people in this world haven’t had the advantages that you’ve had."' is:
You can see that Watson analyzes the overall text, as well as each individual sentence. It gives a score on what percentage (in decimal form, obviously) the text tone is. For example, the first sentence ("In my younger and more vulnerable years my father gave me some advice that I’ve been turning over in my mind ever since.") is detected as 58% sad.
Conclusion
As you can see, we used IBM's Bluemix cloud service, and AI Watson with ease, and for free. All we needed to do was create credentials to use Watson's API. We then created a node project, and with the help of the Watson node library, we analyzed some text.
Our project was very basic, and can be changed to handle more complicated tasks. To be honest, I don't find the Tone Analyzer to be particularly useful, but it's an easy example to get started with IBM's services.
Did something go wrong? Watch the video where I go through all of these steps with you:
Like this content and want more? Feel free to look around and find another blog post that interests you. You can also contact me through one of the various social media channels.
Twitter: @srcmake Discord: srcmake#3644 Youtube: srcmake Twitch: www.twitch.tv/srcmake Github: srcmake What Is Postman?Postman is a browser extension that allows you to test their API functions locally on their own machine. As we've seen in the rest of the API series blog posts, APIs use the methods POST, GET, PUT, and DELETE using the HTTP protocol. When running an API server locally on our own computer, we can test GET operations using our web browser, but we can't do that for the rest of the methods. Postman allows us to do that. What Is A Postman Collection?Postman requests allow us to to make a request to any API method. For example, we may want to test a POST method for our API, and a postman request would have us specify an API request by entering the URL and request body to the API. A Postman collection is literally a collection of postman requests. The purpose is to have a standard list of example requests that test all endpoints and situations our API could be in. This helps us ensure that our API is working correctly at all times, without needing to remember exact urls. It's standard for any API project to create a Postman collection. It's akin to creating unit tests for code: it's just to make sure that the API is working correctly. The Postman collection can be both to our locally deployed API (for example, localhost:3000 while our terminal is acting as the server), and to an actual production API hosted on a cloud server. How To Create A Postman CollectionCreating a Postman collection is actually very easy. First, download Postman if you haven't already. Search your browser's web store for Postman. Here's a link to for it on the Chrome web store. Install it, and launch the app. You should see the following screen: 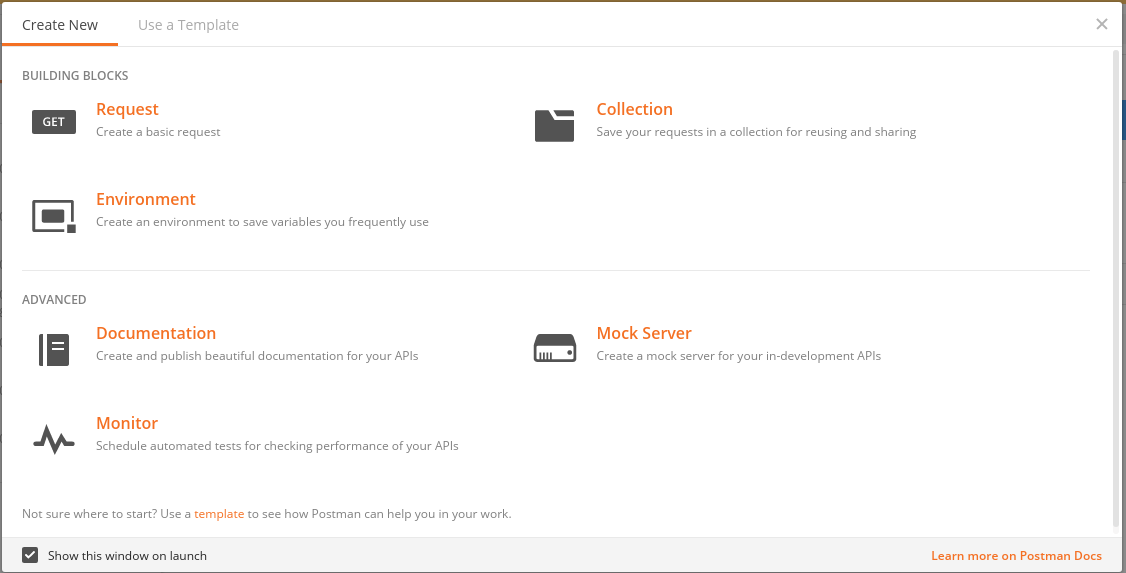 Click on Collection. Enter a name and description, and press the Create button. 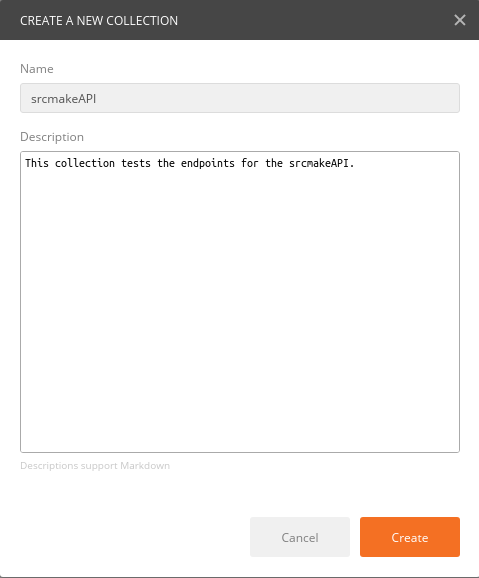 Next, we'll see a list of all of our collections on the left hand of the screen, and on the right side of the screen we see the tool used to make individual requests. Make a request by entering the HTTP Method, the URL, and any necessary headers, body, etc. Press the Send button to make the request. 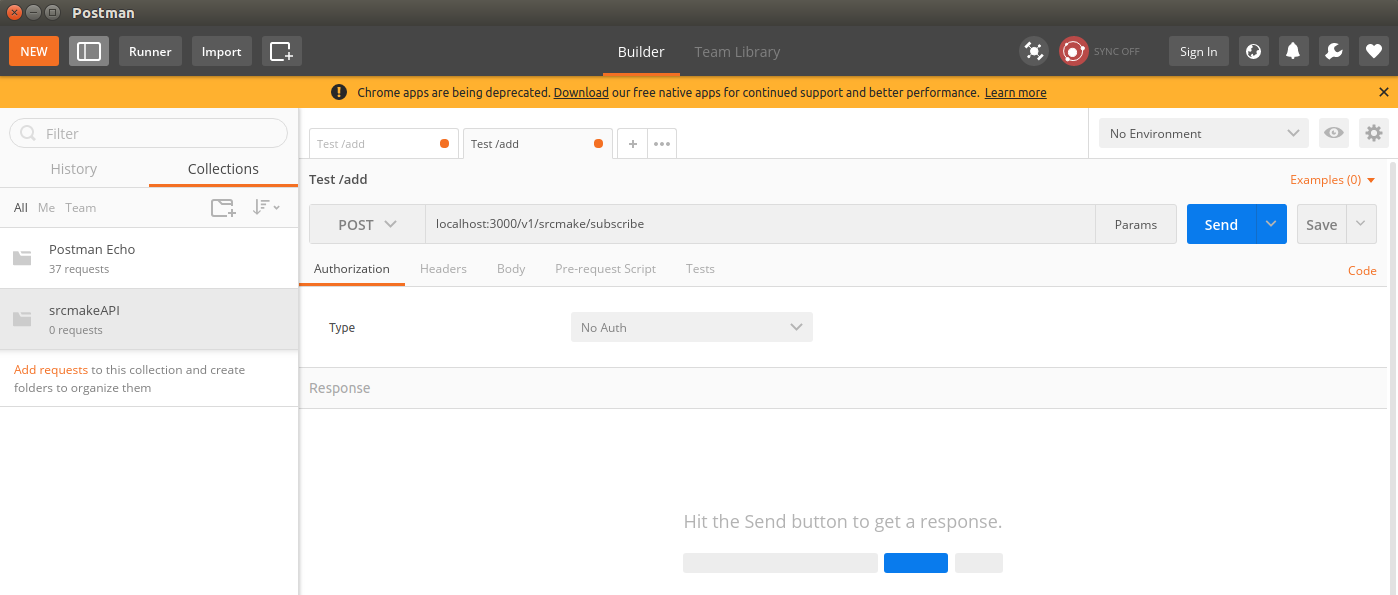 To save this request to our Collection so that we can use it later, click the Save button. Enter a name for the Request, and a description. Select the Collect that we want to save this request too (srcmakeAPI), and then click the Save button. 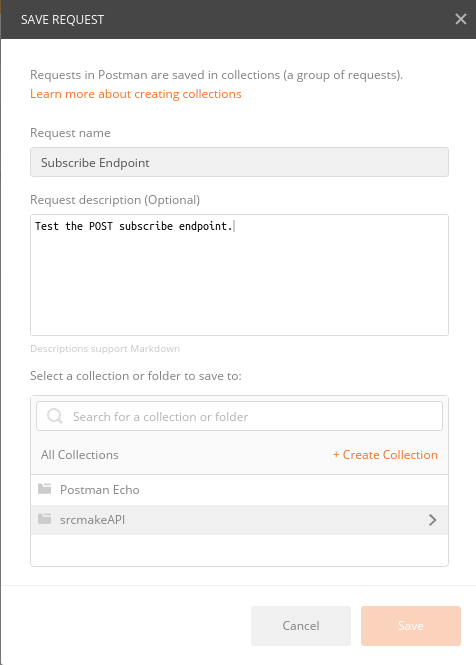 You can see the request is saved to our collection, on the left hand of the screen. Click on the srcmakeAPI collection. 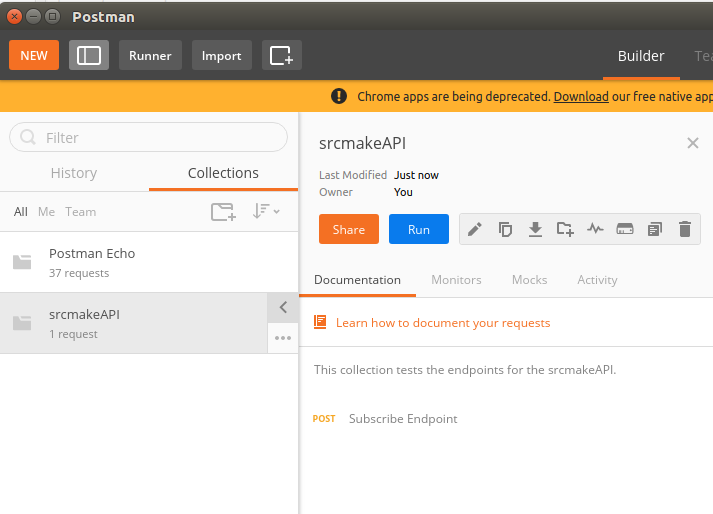 Press the run button. A new pop up will show up with all requests for this collection. You can run them all to ensure that your API's endpoints all work correctly. 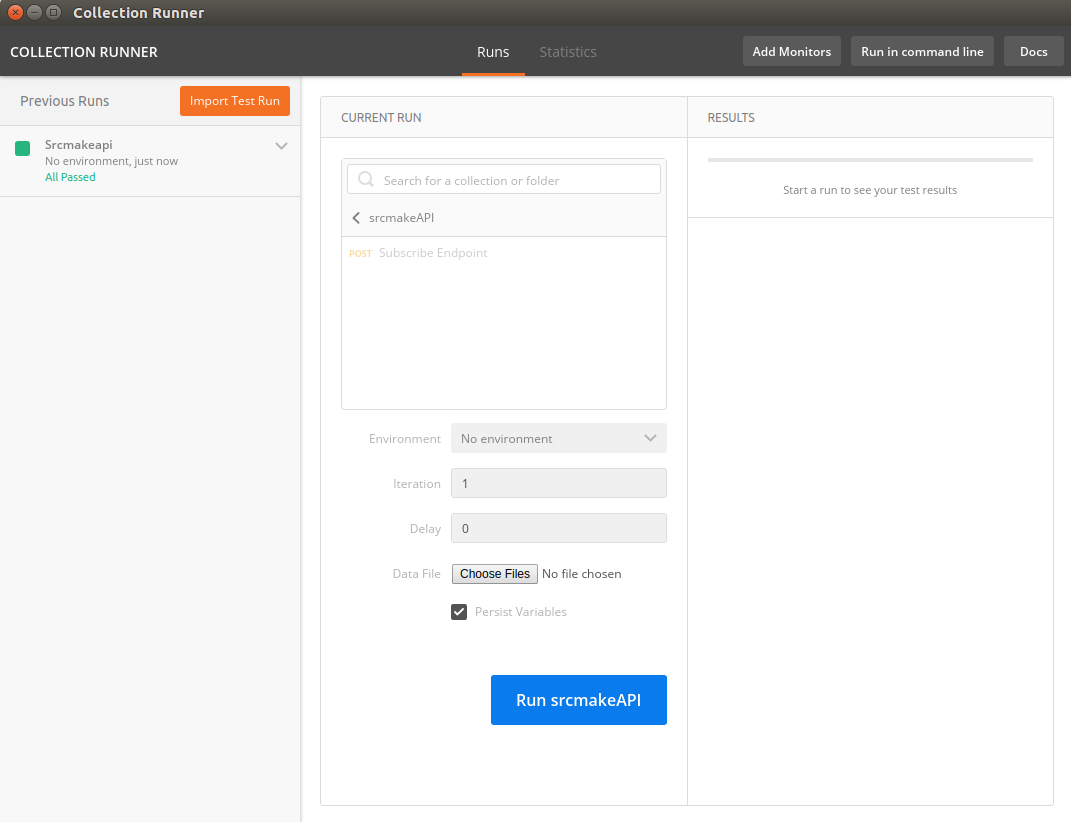 ConclusionAnd that's it. Make the requests as complete as possible with many examples so that you can adequately test your collection. Postman is easy to use, and very necessary to make sure your API is working as expected. It's not hard at all to use, it just requires a little thinking to make sure your entire API is covered. Also use it while developing to make sure the endpoint is working, as you code each one. Like this content and want more? Feel free to look around and find another blog post that interests you. You can also contact me through one of the various social media channels.
Twitter: @srcmake Discord: srcmake#3644 Youtube: srcmake Twitch: www.twitch.tv/srcmake Github: srcmake
To watch the youtube video where I go through this tutorial, click here.
Introduction: Making An API Using Java
If you're new here, then we've already had a blog post on what APIs are, and we've even seen how to plan and define the specifications for an API using Swagger. At this point, we need to actually code up the API so that we can put it on a server. Of course, one of the most popular programming languages to do that is Java.
If you're not familiar, then go through the video series where we learn about Java. It's also in that series where we learn about the most necessary tool for creating APIs: Spring. Of course, we're going to make an API with the specifications that we've defined from the previous blog posts, but we need to start somewhere. Start Off With A Basic Spring Project Deployed on Heroku
We're going to start our API by creating a basic Java Spring project. I already have a video where we do exactly that, so watch the video if you're unfamiliar with this process. The base project can be found here, on github, if you need the code. To get the code from github, in the terminal:
git clone https://github.com/srcmake/java-base-api
cd java-base-api
The most important things to notice in the project is that it's built using Maven, it has Spring as the API library, and it has one simple mapping for now that returns a string.
While we're at it, push our project to Heroku. If you haven't already, in the terminal for Ubuntu 16.04 the commands for installing Heroku are:
sudo add-apt-repository "deb https://cli-assets.heroku.com/branches/stable/apt ./"
curl -L https://cli-assets.heroku.com/apt/release.key | sudo apt-key add -
sudo apt-get update
sudo apt-get install heroku
(If you're not using Ubuntu, then find the commands to install Heroku from here.) Install git if you don't already have it.
sudo apt-get install git
If you don't have an account with Heroku, then go to their website and make one. Login to heroku.
heroku login
Create the app on heroku's servers.
heroku create
Next, push our project up to heroku's servers.
git add .
git commit -m "Initial commit."
git push heroku master
And then in the browser ensure that you see "Hello world from srcmake!".
heroku open
We went through this section quickly, but I did a whole video on it in Part D of the Java Series, so be sure to watch the video on it if you're confused.
Expand The Project For Our Necessary Endpoints
We want our URLs to look like: www.srcmake.com/v1/fruits/add. We need paths for /v1/fruits/add, /v1/fruits/subtract, and /v1/fruits/check. Luckily, this is easy to implement using Spring. We'll add for functions that handle each of these endpoints, as well as the specific HTTP methods that the endpoints go with. (This webpage is a really really good resource for seeing how to add paths using Spring's request mapping.)
In src/main/java/com/example/myapp, change the contents of "DemoApplication.java" to the following:
(The indentation looks really weird. Sorry.)
We added three functions, one for each of the endpoints that we care about. They return placeholder strings for now.
Our project is actually complete right now. For now.
Testing The Code
We need maven to test the code, so if you haven't installed it yet, go to the Java series page and scroll down to Video A: Building with Maven. Follow the instructions to install Maven.
In the root of our project directory (make sure to go back to our project if you had to install maven), run the following command.
mvn spring-boot:run
The terminal should be acting as a server now, so we can test our code using postman (or the web browser). Go to the following URLs to check each of our endpoints:
localhost:8080/ localhost:8080/v1/fruits/check localhost:8080/v1/fruits/add?fruitname=apple&quantity=50 localhost:8080/v1/fruits/subtract
Make sure the last two commands are POST. (Meaning you need to use Postman, not just the web browser. If you don't know how to use Postman, see this article.)
Try the /add endpoint without giving a fruitname or quantity and see what happens. Currently, we'd give an error message, which is VERY bad programming. We'll handle that in a future video.
Don't forget to push the code to Heroku. (If you want too.)
git add .
git commit -m "Added fruits endpoints."
git push heroku master
Conclusion
Okay, so in this blog post we took the starter API code that we we made in the Java series, and we start by git cloning it locally to our computer as well as pushing it to Heroku. (Which is good for testing.)
The main thing that we did was add a few endpoints by creating extra functions. We also saw how to get our server running so that we could test those endpoints using postman, with maven as our build tool. What we did was very very basic, but it's the building block for writing a Java API. However, there's a TON of stuff that we didn't do. We didn't handle when the user forgets to give a parameter, which means giving a default parameter type. We didn't handle different response codes. We didn't move our functions to another file for cleanliness. We also didn't actually code the database functionality or write anything useful for our endpoints (although, that's more "Java" than it is "API").
In another blog post, we'll go over the advanced topics of building a Java API. To be 100% honest, building the API in Node is sort of easier, so before going too deep with Java, give the Node tutorial a shot. However, we'll still trek deeper with Java APIs in the next blog post.
Here's the youtube video where I go over the steps in this article:
Like this content and want more? Feel free to look around and find another blog post that interests you. You can also contact me through one of the various social media channels.
Twitter: @srcmake Discord: srcmake#3644 Youtube: srcmake Twitch: www.twitch.tv/srcmake Github: srcmake |
AuthorHi, I'm srcmake. I play video games and develop software. Pro-tip: Click the "DIRECTORY" button in the menu to find a list of blog posts.

License: All code and instructions are provided under the MIT License.
|
