|
To watch the 20 minute video where I explain the concepts and go over the code, click here.
Introduction - Hyperledger
Hyperledger projects are blockchain related tools built by the open source community and the Hyperledger organization. We've already done a blog post on Hyperledger Iroha, and another on Hyperledger Fabric. Now we're going to look at Hyperledger Composer. If you're completely new to blockchain, then take a look at this blogpost on Blockchain Explained With 10 Simple Questions.
This blog post is going to introduce us to Hyperledger Composer, without installing anything. We'll go through the terminology and concepts of Composer, and then we'll use the Online Playground in the web browser with an example to make a demo blockchain. What Is Hyperledger Composer?
Hyperledger Composer is a tool to help easily create blockchain networks. The best way to think about it is: you want to make your own custom blockchain, but it's simple enough that you just need to define who is going to be using the blockchain and what they're going to be trading/creating, then Composer will let you define those people/items and you can have your blockchain ready with minimal code.
Composer is much easier to use than Fabric, but you have less control over the blockchain. Composer Terminology and Concepts
Let's go through a few keywords and concepts. Some of these are relevant because they're keywords in the programming languages used in Composer.
To help us understand these concepts, this is going to be our example scenario:
We own a fast food restaurant. We sell food, and customers buy food. And maybe there are other fast food restaurants on the blockchain.
Simple enough, right? Let's see look at Composer concepts and see how it would relate to our example.
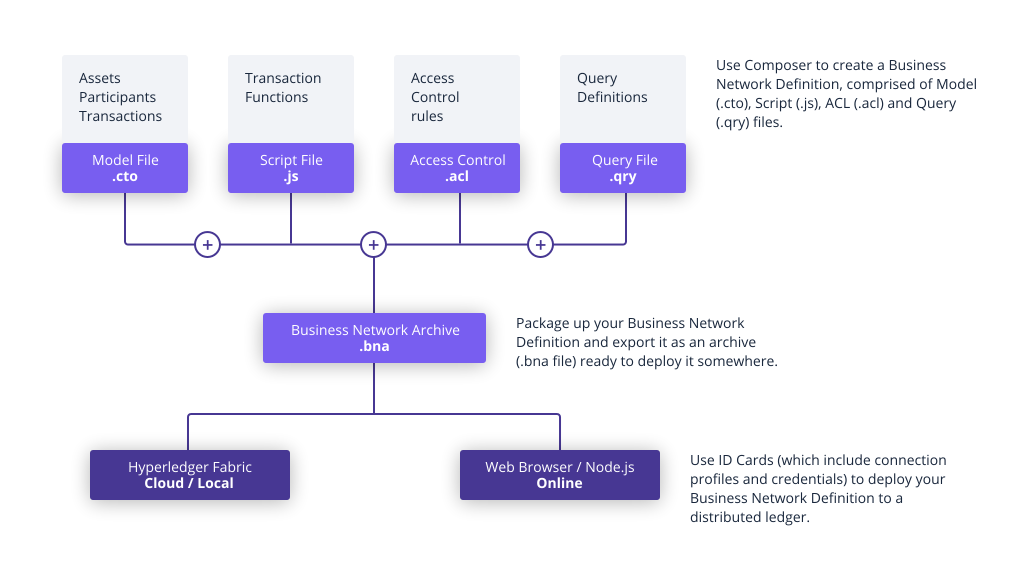
How a Composer network is bundled. (Picture is owned by Hyperledger.)
Hyperledger Composer Demo Code
Now that we know more about how Composer works, let's actually look at some example code. To make things simple, we'll have two files, one CTO file for our models (assets, participants, transactions, events) and one JS file for our javascript transaction functions. (An ACL file will automatically be generated for us for basic projects.)
CTO File:
lib/scripts.js (Function) file:
We'll use the code above in Playground to see how a sample network can be created.
Testing The Code In Playground (Online, No Installation)
This is where our files will exist for our blockchain and where we'll deploy the code, and do our testing.
Click on "Model File" on the left. Delete everything inside of the model file, and paste in our CTO code from above. Next, click the "Add a file..." button, select the "Script File (.js)" button, and press the blue "Add" button. Delete what's inside of the current script file, and paste in our Transaction function from above. Press the blue "Deploy Changes" button on the left. And like that, our blockchain is created and deployed. Now on the top of the scree, there's going to be a "Test" tab next to "Define". Click "Test". This is where we can play with our deployed network. Click the "cook" Participants tab on the left. Let's add a new cook by clicking the "+ Create New Participant" button. Delete the JSON Data Preview there and paste the following JSON code in:
Notice in the code: We're adding a cook (the only type of participant that we currently have defined) whose name is "chefBilly" to the blockchain, and he has an employeeId of "1111".
Press the blue "Create Now" button to add this participant. Now click the "burgerAsset" tab on the left of the screen, and click "+ Create New Asset" to create some new burgers. Delete the JSON Preview Data and add the following JSON code in:
We're creating some burgerAssets and giving it an assetId of "cheeseBurger" (and this assetId represents the specific batch of burgers we're making). We're saying that the owner of these burgers is the cook with an id of 1111 (which we know is chefBilly). And to start out with, we have 5 of these burgerAssets.
Click the blue "Create Now" button to create these assets on the blockchain. Finally, let's update this value by using the function we made. Click the blue "Submit Transaction" button on the left of the screen. By default, the drop down menu will only show the "MakeBurgers" transaction, because that's the only transaction we defined. Delete the JSON Data Preview that's there and add the following JSON code in:
Notice that we're calling the MakeBurgers transaction, and the "burgers" that we're talking about (that we mentioned would be part of the transaction when we defined MakeBurgers in the CTO file) is the burgerAsset with the id of cheeseBurger. We specify that the newBurgerCount is going to be 10.
Click the blue "Submit" button to make this transaction.
And like that, we've changed the number of burgerAssets (with id#cheeseBurger) that chefBilly owns. If you look at the burgerAssets tab and look at the ones with id#cheeseBurger, you'll see that the quantity is now 10. (And if you check the record for the transaction in the All Transactions tab, you can see that an event went out.)
Conclusion
With this tutorial, we've learned all of the Hyperledger Composer concepts, keywords, and filetypes that we'll need to create a blockchain network. We saw some demo code and even tested that demo on the Online Composer Playground.
In future tutorials, we'll create more complicated networks with more participants, assets, and transactions. We may also compare native Fabric development vs. Composer development (which one is better for making a blockchain?).
Like this content and want more? Feel free to look around and find another blog post that interests you. You can also contact me through one of the various social media channels.
Twitter: @srcmake Discord: srcmake#3644 Youtube: srcmake Twitch: www.twitch.tv/srcmake Github: srcmake Comments are closed.
|
AuthorHi, I'm srcmake. I play video games and develop software. Pro-tip: Click the "DIRECTORY" button in the menu to find a list of blog posts.

License: All code and instructions are provided under the MIT License.
|
